It’s somehow week two of the Spring One Room Challenge (sponsored by Apartment Therapy), and I’m starting to feel a little more confident with how the room is going to come together (eventually).

I didn’t get as much accomplished in the last week as I’d hoped I would, but for good reason—my puppies wanted a lot of snuggle time, and I wanted to embrace that. Plus, I’m a perpetual procrastinator.
So…what did I get done?
While I didn’t get everything done that I was planning, I was still able to accomplish a good bit:
- Brought in the base cabinets with the free labor of my husband’s buddies
- Removed all the baseboards, window trim and trim around the french doors
- Measured and cut out a strip of carpet for where the base cabinets will go
- Planned out a bench for the dogs
- Planned out the future fireplace
- Got a quote for removing the popcorn ceiling
- Ordered tools to remove the popcorn ceiling myself
- Ordered lumber for the bench and fireplace builds
When I look at this list, I feel pretty good about what I got done within a week. I’m much further along this time than I was for the Fall ORC. Still have a ways to go, but we’re getting there.
The curse of the trim
One of the biggest updates I’ve made to rooms in this house to take it from 1989 wooden blah to modern beauty is replacing the trim and baseboards, one room at a time. I love a clean, white trim. Nothing fancy. I’m pretty sure that the trim currently in the house is original to the house and is all stained wood. Not really my style. (No shade to those of you who like wood trim!)
Usually, replacing trim is an easy and relatively inexpensive update to a room. So when I saw “remove trim” on my to-do list, I figured I’d be done within an hour and ready to move on to the next project.
Boy, was I wrong.
This house throws new curveballs at me every single time I work on a new room. The only issue I had in the great room during the Fall ORC was one baseboard that had been screwed in at one corner. That was a nice surprise.
This time around, I really struggled to remove the trim in my new office space. It took me about 10 minutes to remove a four-foot section of the baseboard. That’s not normal. Usually, they come out pretty easily. And since these baseboards are stained, there’s no caulk to contend with.
Turns out that in addition to brad nails, these baseboards were installed old-school style—with 2-inch long nails. You’d think these baseboards were holding up the house. (Side note: If you hear about a house collapsing in Minnesota, come check on me.)
It took me a few hours to remove all the trim in this room. Not normal. But I got all the trim removed, minus the door trim around the double pocket doors (I’ll tackle that this week), and safely transported to the garage, where they will probably sit until the end of time.
Once the trim was removed, I could move on to the carpet. Oh, the carpet.
Confidence to cut the carpet
The biggest roadblock to the built-in cabinets and bookshelves was cutting the carpet. Build cabinets with bookshelves? No problem. All the confidence in the world to build something I’ve never attempted before. Cutting out carpet? I had to work up the courage for that.
Had it not been for what I’ve seen on Instagram, I would’ve just built the cabinets right on top of the carpet. Luckily, I follow so many amazing creators that I learned before I even planned this out that building on top of carpet is a no-no.
Why was I worried about cutting the carpet? It’s one of those things you really don’t want to mess up. I know I mentioned in my room tour on Instagram last week (check it out in my Spring ORC highlight bubble) that I’m not a huge fan of the golden/tan zebra/tiger print carpet, but won’t be replacing it right now.
I measured a base cabinet, measured it again, measured it to confirm for the third time, and then marked the measurements on each wall. Then I took my handy FrogTape (not sponsored) and placed tape (measuring every foot or so) all along where my cut would be. Once I had everything taped out, I grabbed my knife and a level (something to guide the knife against) and decided that I wasn’t ready.
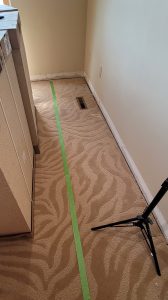
I did that for about four hours until I finally just bit the bullet and started cutting. While the carpet was really thick, I had it pulled up in minutes. The padding was easily removed as well, and the subfloor looked great. Sometimes you just have to build up the confidence and go for something that makes you nervous. For me, it was cutting the carpet.
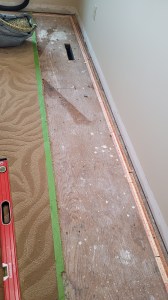
Now, all that’s left is removing staples and the tack strip before I can build my base for the base cabinets to sit on. That should happen over this next week.
Planning for new builds
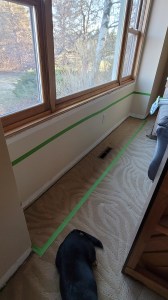
I decided that since the dogs and I spend about eight hours a day in my office, that I really did need to consider building them a bench so they could earn their keep by being watchdogs. In order to do this, I measured a standalone bench I have in my current office for the depth and height (15″ deep and 20″ high, including the cushion) and mimicked that in my new office.
The window wall juts out about 12″, so the 15″ depth looks fine. I was concerned it would be super noticeable, but the depth will be perfect and will look as if it was always supposed to be there (I hope). As a visual, I used more FrogTape to plot out the depth and height. If you don’t do this and are a visual person, it’s so helpful.
Once I had the bench figured out (easy since it’s essentially a big rectangle), I moved on to how I would create a fireplace. I started with tape on the middle of the wall opposite of where the built-in cabinets would be. It just looked weird. So I threw that idea out the window.
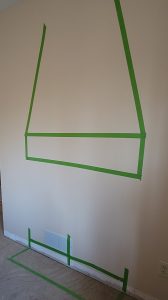
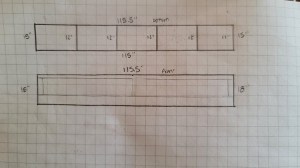
I measured out how much space I had in the corner and decided that a corner fireplace was just the ticket. I scored a great lightning deal on Amazon for this electric fireplace,* so I knew it was kismet. Reminds me of when we see Sirius Black in the Gryffindor common room. I used graph paper to plot out what the fireplace could look like and then drew out what it would look like from the front.
I am in no way, shape or form any sort of artist. But I’m good with a ruler.
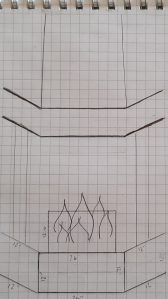
With everything on graph paper, I was able to easily calculate how much lumber I would need, including plywood. Home Depot makes it easy with online ordering and curbside pickup, so I placed an order today and get to pick everything up after work.
The death of popcorn is to come
One last major to-do I completed this past week was getting a quote on popcorn ceiling removal. Knowing that removing a popcorn ceiling could be on the pricey side, I braced myself but had a number in mind for this size room. The quote I received was more than twice the number I had in my head (based on the research I found that contractors typically charge about $2 a square foot for removal), and about five times the amount based on the research I’d done.
I laughed before I realized I would have to take this on myself. So, I spent about $80 on supplies via Amazon and will get started with that tedious task myself. Only thing it’s going to cost me is time and my sanity.
I may end up at St. Mungo’s.
*This item is an Amazon affiliate link. What that means is that if you click on a link I provide and buy an item, I get a few pennies. There is no cost to you whatsoever.
