Last year, I was either using a stolen wand, or the Spellotape I had on there just wasn’t doing me any justice. If you were following along during the Spring 2022 ORC, you know that I didn’t even come close to finishing my Harry Potter-inspired home office. I’m pretty sure I have my wand (and my aging body) to thank for that. Luckily, my spell casting didn’t cause me to regurgitate slimy slugs…it just caused me to strain a muscle in my back.
But guess what? I’m back for round two! And I plan on at least reaching the 95% completion mark, just to stay on par with all my other house projects that are also sitting at 95%.
On the prodding of my good Instagram buddy Leslie, I signed up for the Spring 2023 One Room Challenge (which I’ll just call ORC for short). While I’m lucky that this office has been tucked away for a year and not impeding my daily life, I can no longer let passersby think that we’re hoarders based on the current state of the yet-to-be-finished office. (I removed the blinds last year, and yes, you can see straight in there.)
So, let’s get caught up on where we started this whole thing, and where we currently are.
Accessing the Pensieve
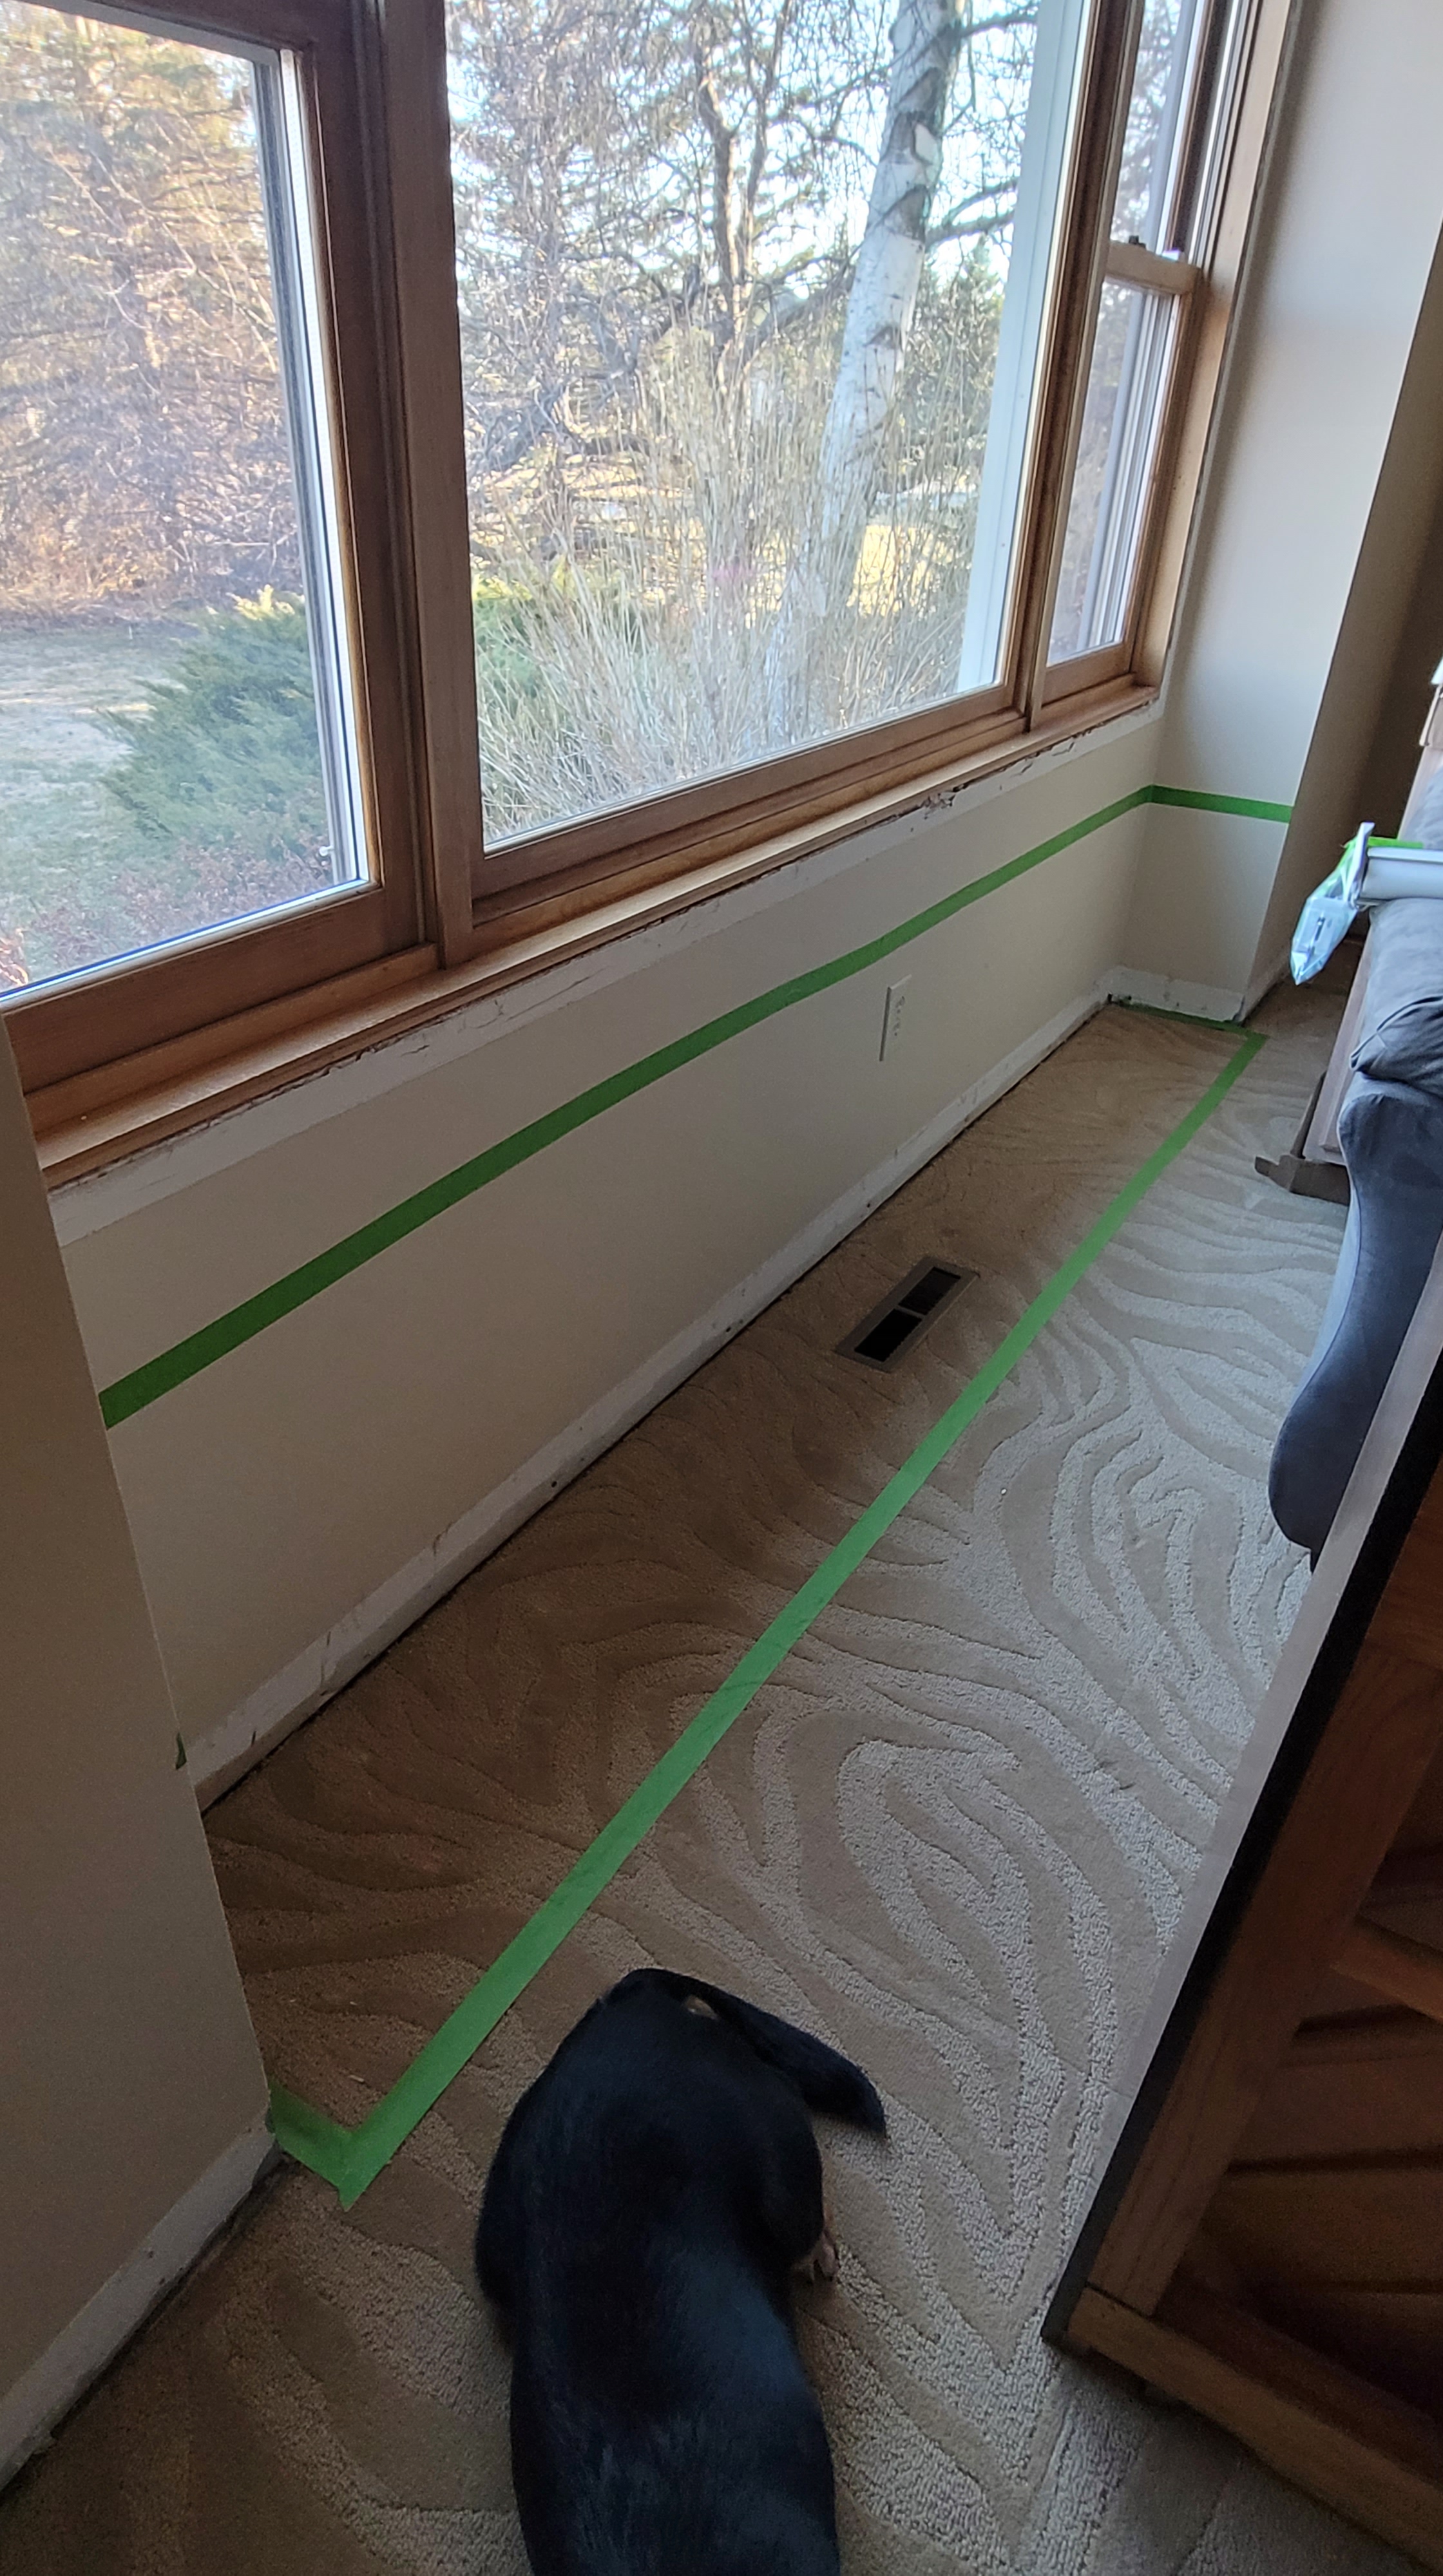
Here’s where we started the Spring 2022 ORC:
Cleaning out the Room of Requirement
Removing all baseboards and trim
Removing window coverings
Prepping and removing carpet
Planning new builds (i.e., the built-in cabinets/shelves, window seat for the dogs, and a fireplace)
Check out my first Spring 2022 ORC reel here, and then the first week of progress here.
Fast forward several weeks, and this is where we had to stop last year:
Popcorn ceiling removed
Carpet pulled up to make room for the built-ins (we’ll replace the flooring at some point, but it’s not in the budget for now)
Air vents re-routed
Cabinets installed
Window seat base installed
Fireplace base installed
Most brick adhered to the wall
Most new trim installed
New lighting installed
First step of painting the ceiling completed
Beadboard (last-minute addition) installed on the window bench and behind the not-yet-installed shelves
Secret door projects started
About that time, we were six weeks into the ORC, and I’d strained a muscle in my back about four weeks in. I did my best trying to move forward, but I had to listen to my body and let it rest. Because of that, the office sat in disarray until a couple months ago. It essentially became a dumping ground—yet again.
The current state of things
Back in February of this year, I’d taken two days off of work because we’d planned to meet some friends in New Orleans for Mardi Gras…until we learned that roundtrip tickets would cost us $2,600. Not even kidding. Instead, my husband flew with some friends to Ottawa to watch hockey games, and I stayed home and got some work done in the office.
To get you up to speed, here’s what I accomplished in those few days:
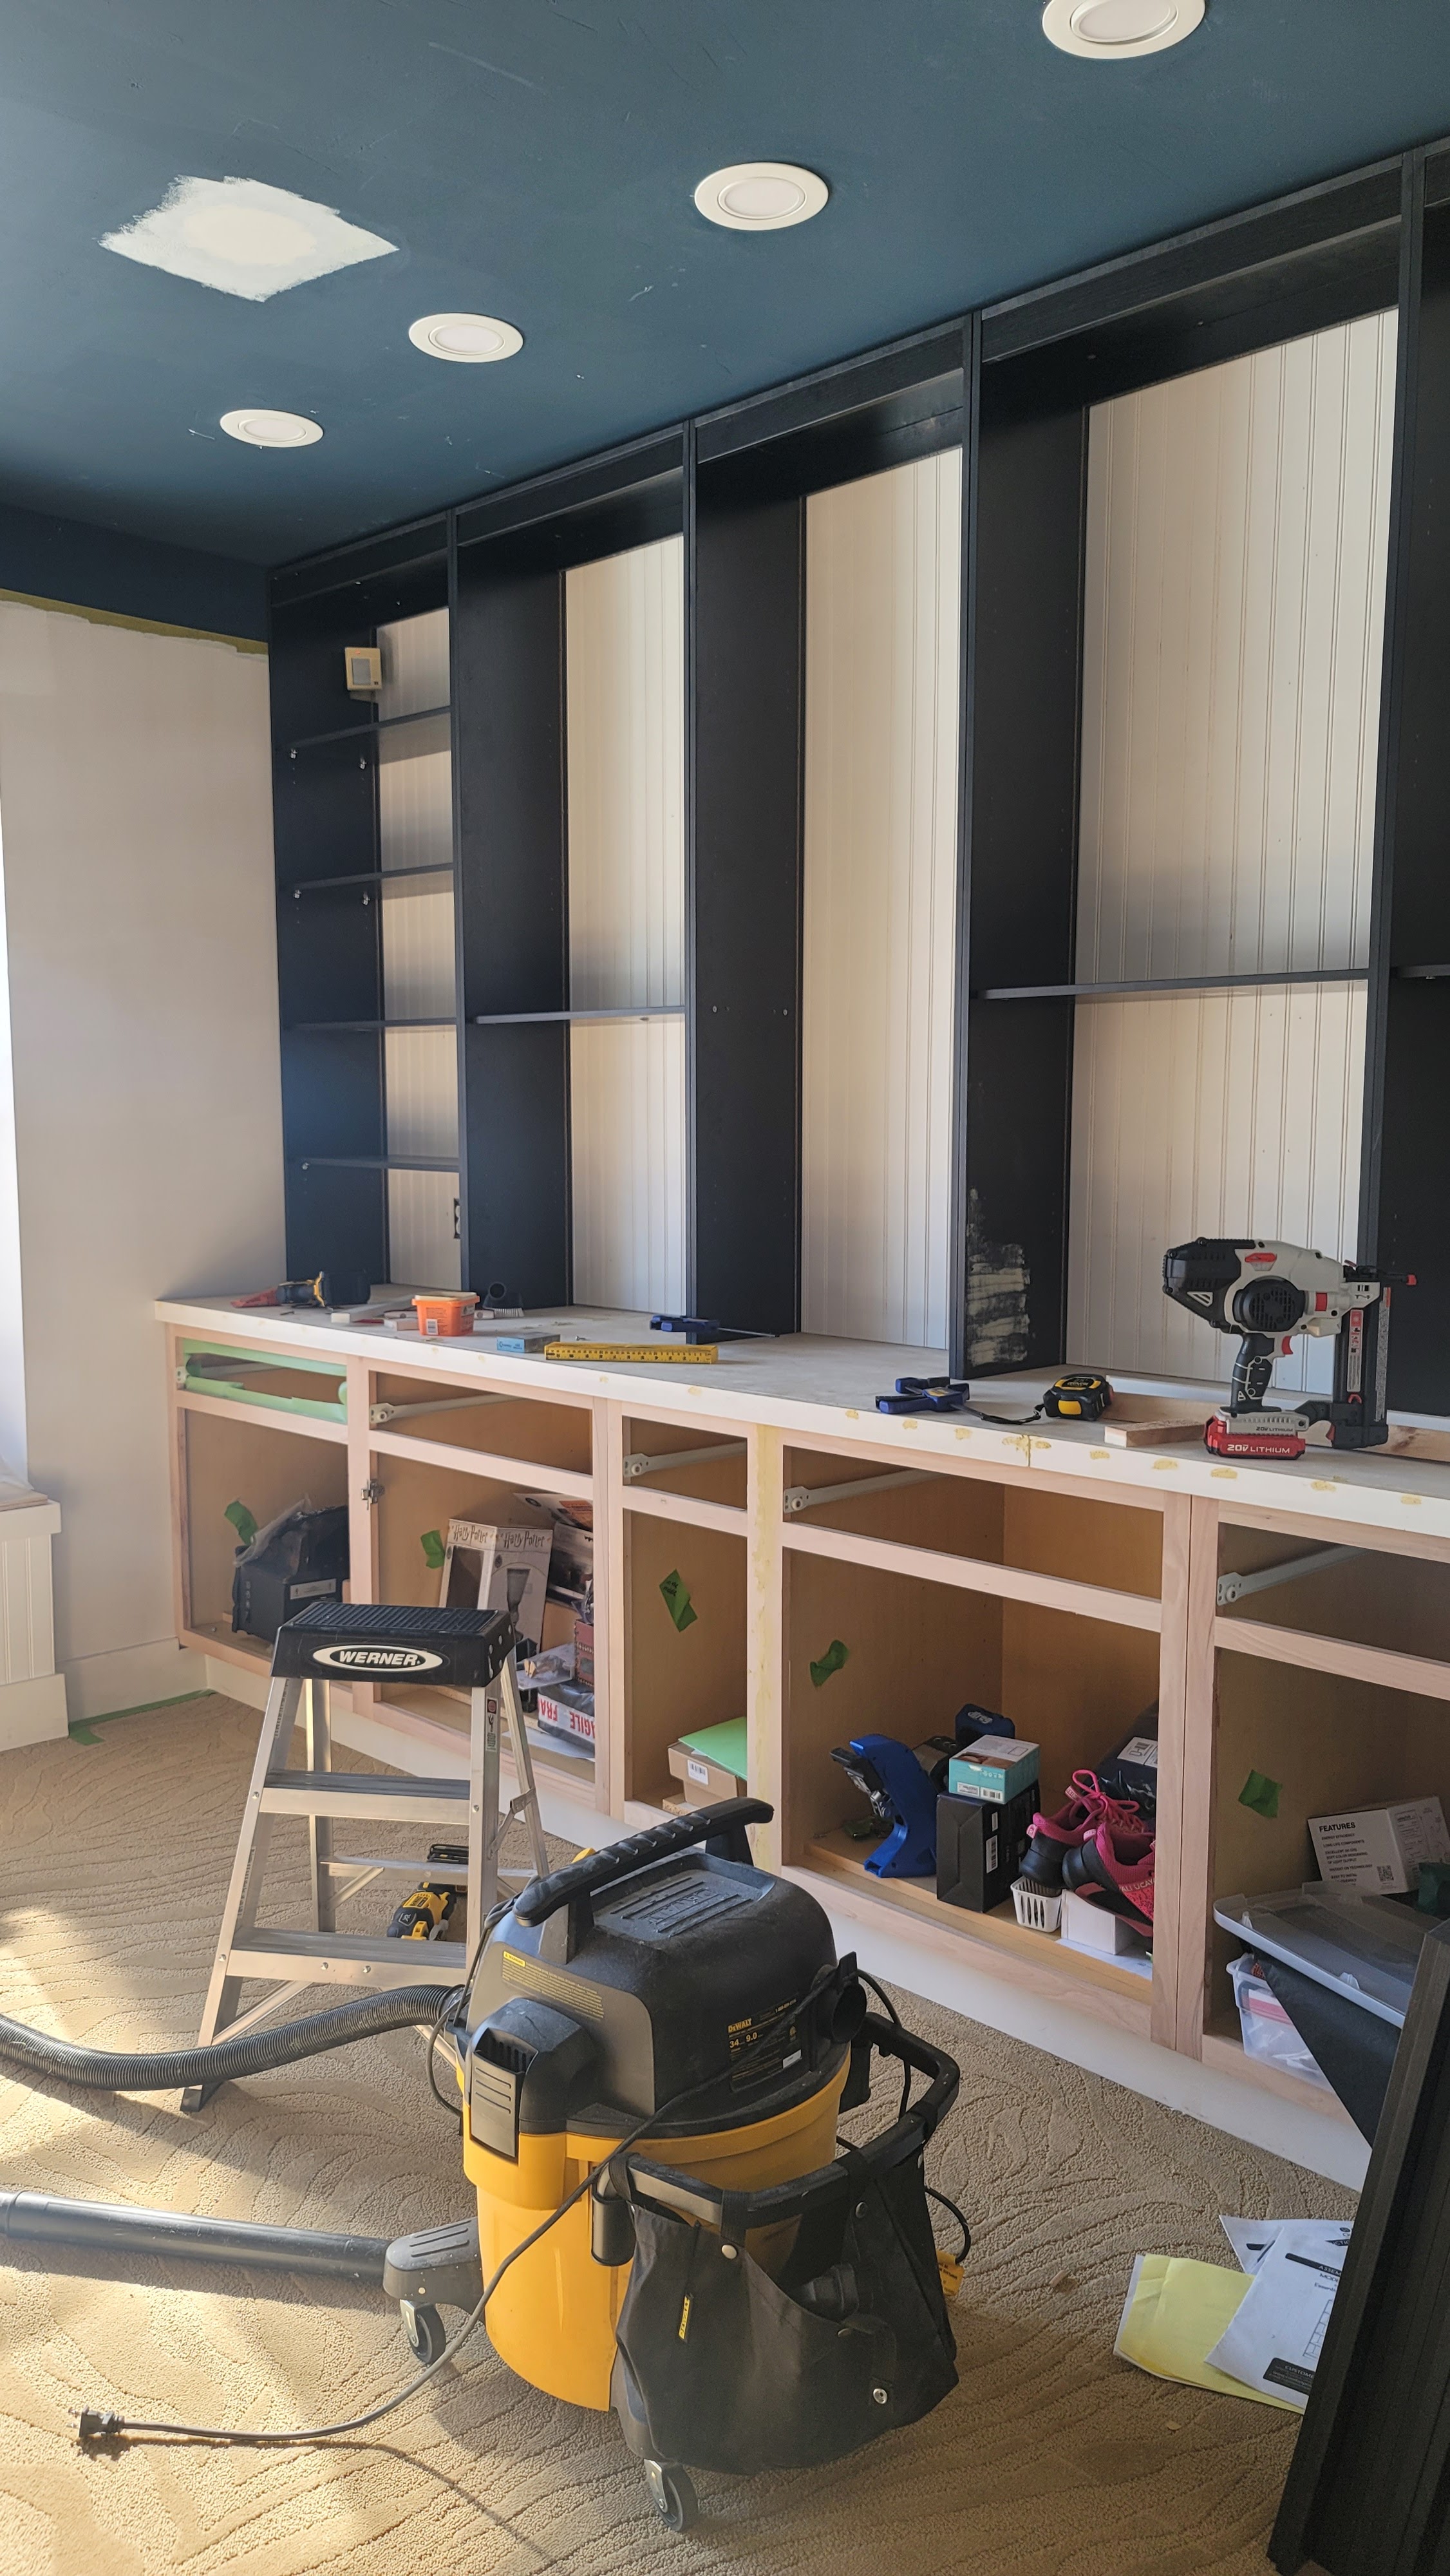
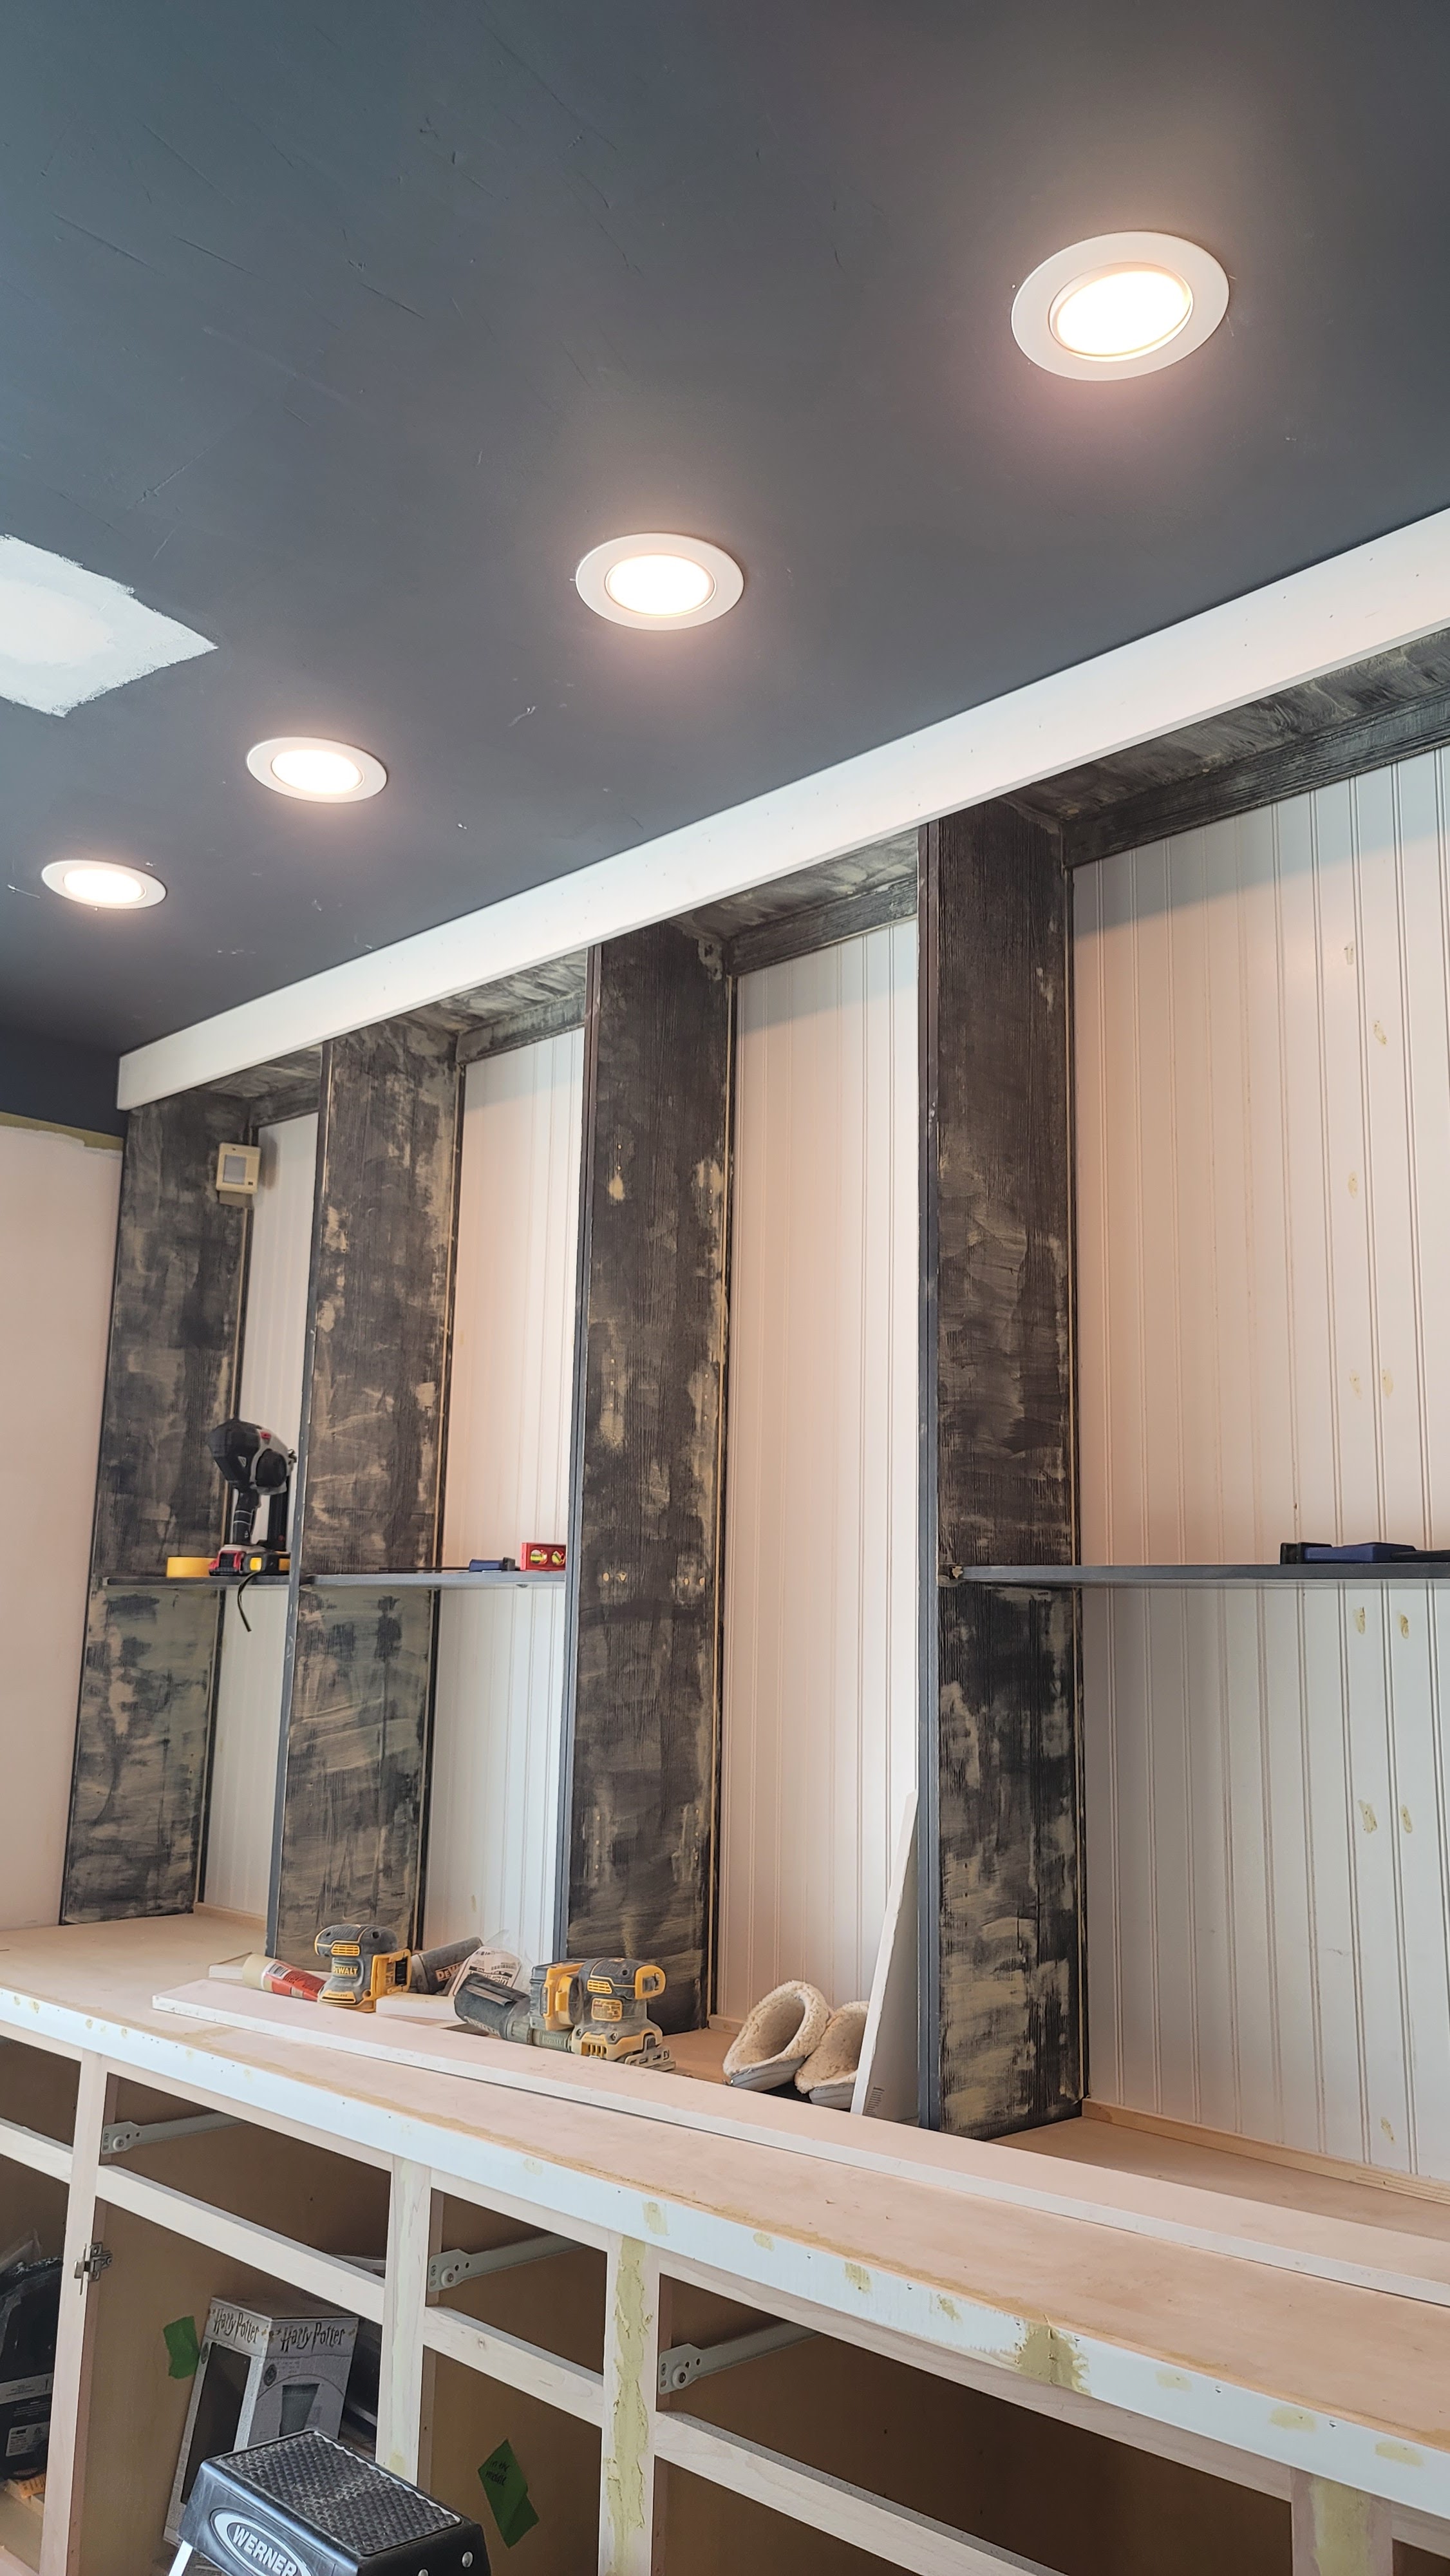
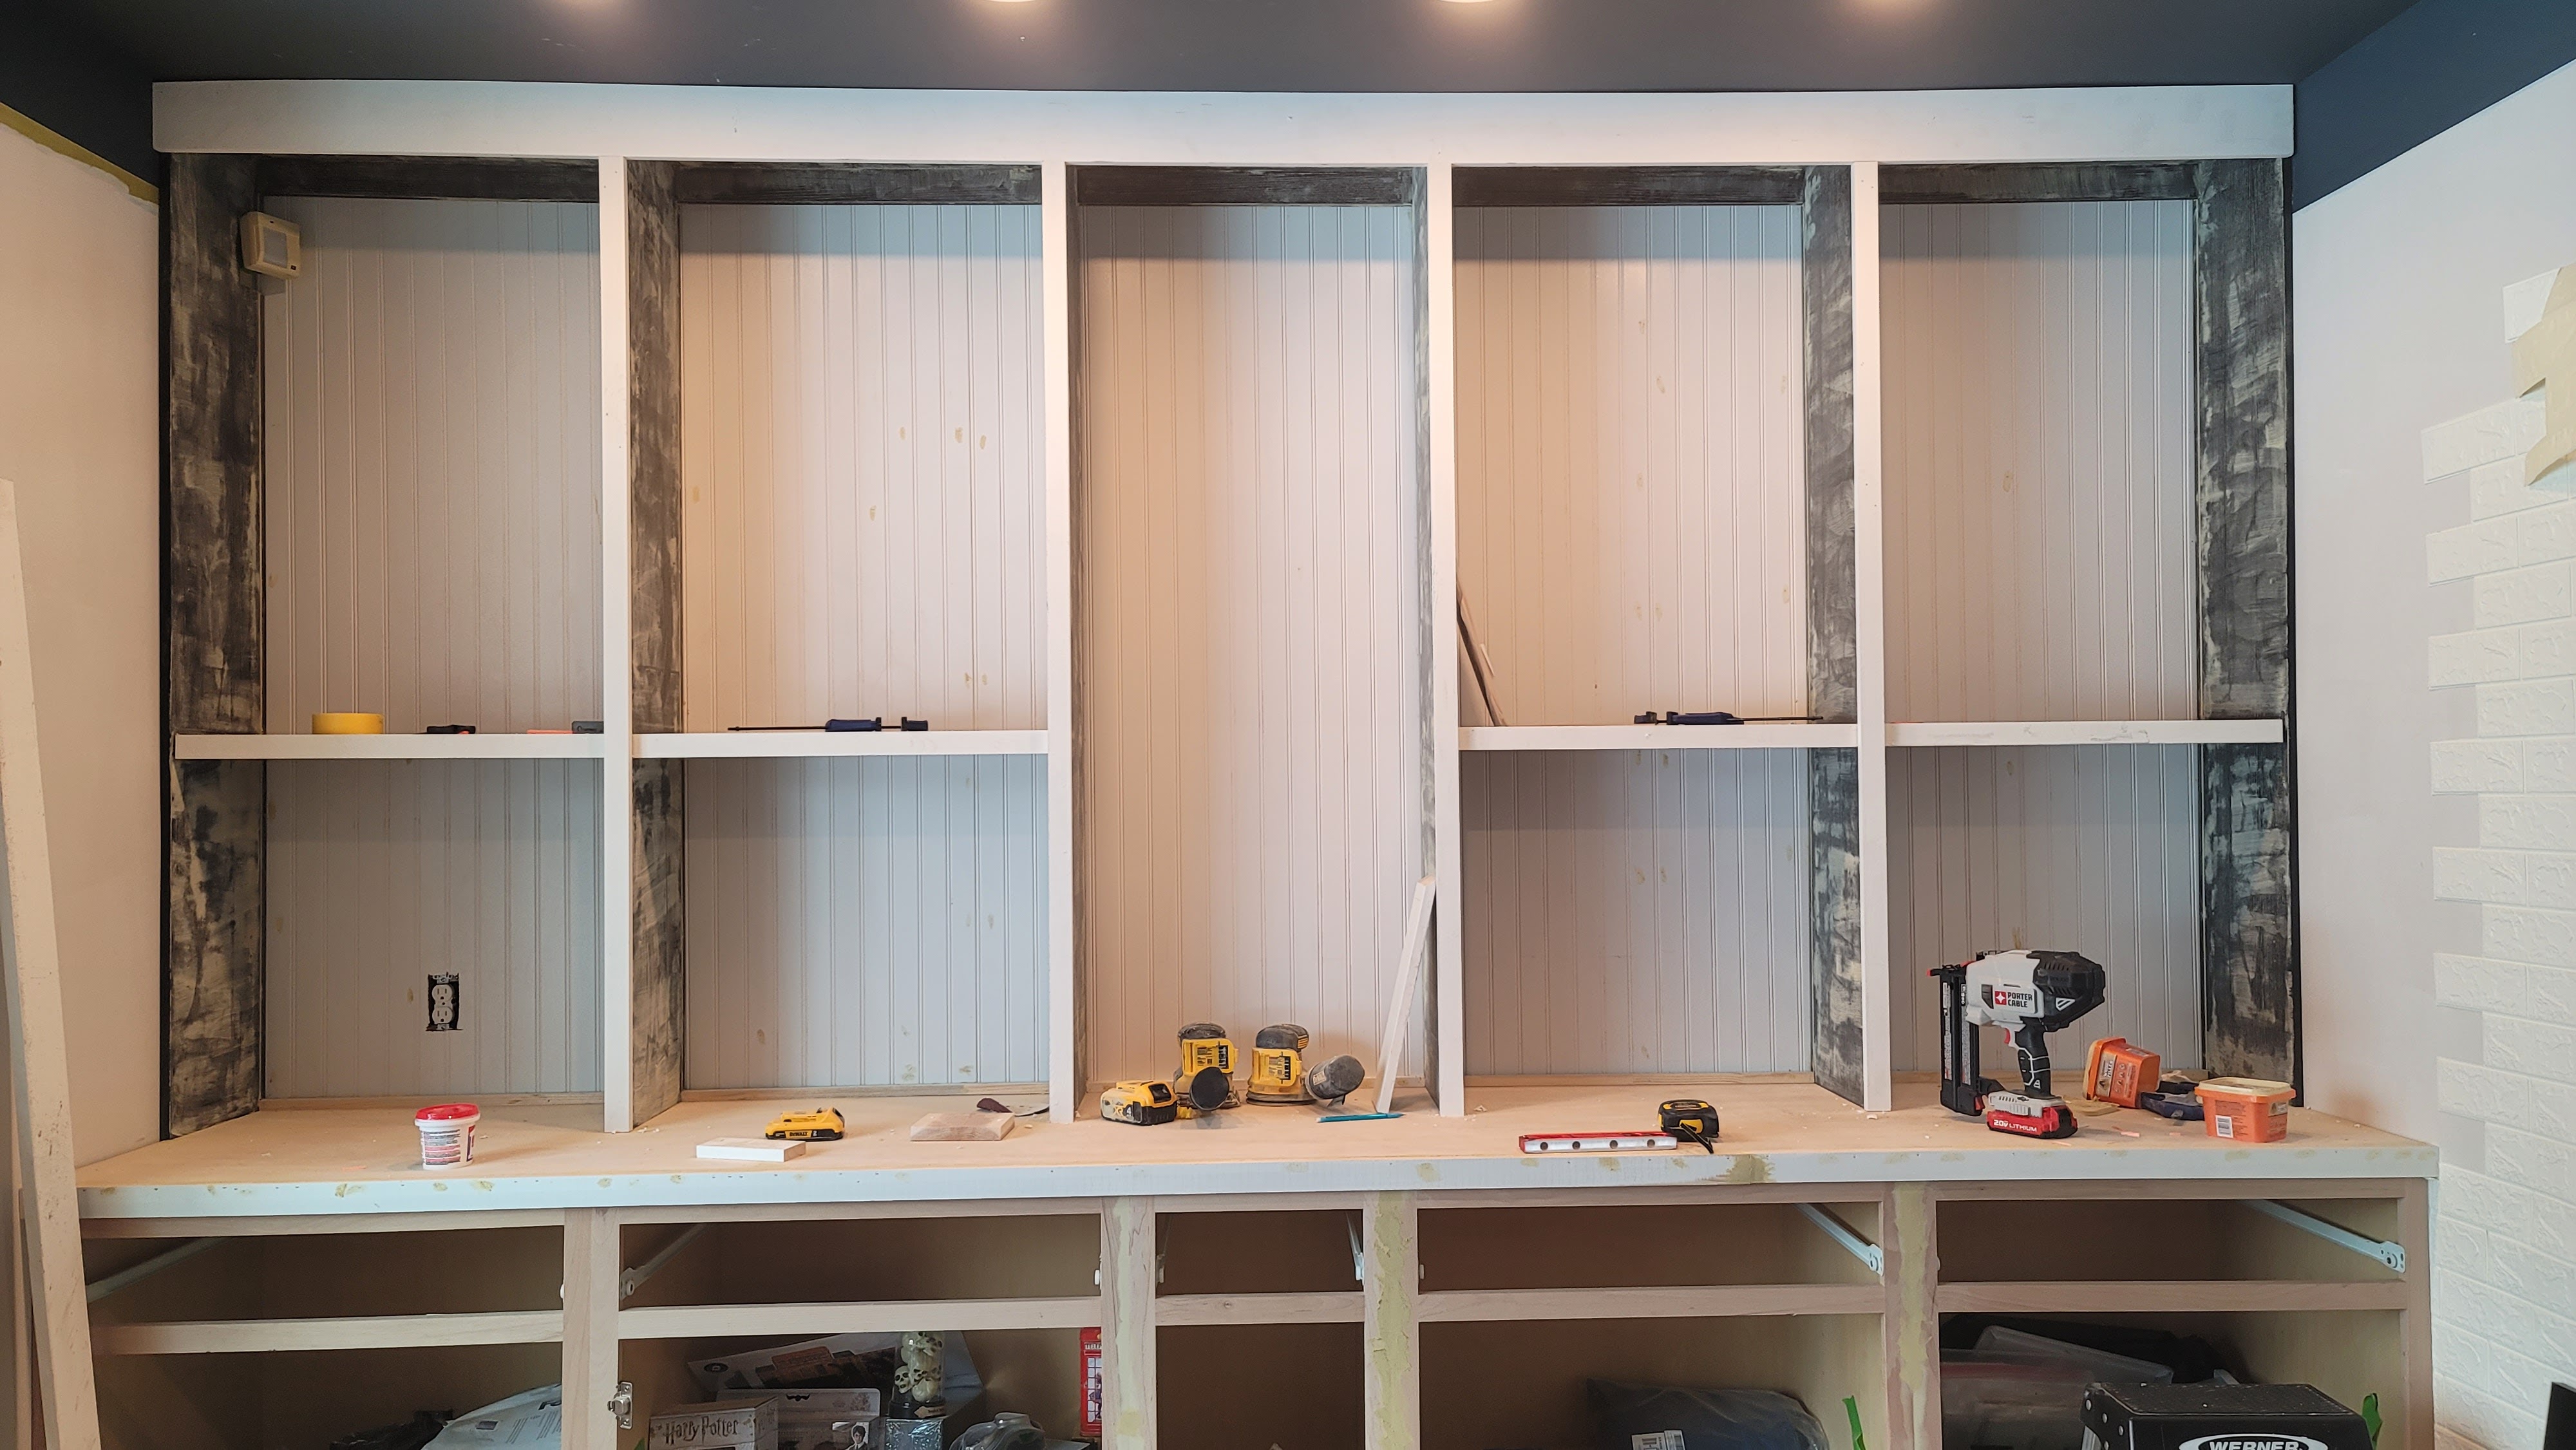
Bookshelves were installed
Wood grain was filled in on all the vertical pieces
Trim was installed to the top, the vertical trim and the horizontal trim for the fixed shelves
Most bricks were installed (not pictured)
Base coat on the ceiling finished (not pictured)
Nail holes/joined wood filled with wood filler
I’ve made very slow progress, but luckily, ice fishing season is mostly over, so I don’t see any travel plans getting in the way of the ORC this spring. Although, my garden will have to take some precedence at times.
You may be wondering what’s left to do. So am I. It’s quite an overwhelming list, so maybe I’ll share that once I have a better plan. After all, this perpetual procrastinator is doing what she does best…procrastinating.
Follow along
Make sure to follow me on Instagram to keep up with the progress of this Harry Potter-inspired home office. I’ll be posting in stories, possibly making some reels, and, of course, you’ll see some carousel posts as we make our way through the Spring 2023 ORC.
Week 6 of the One Room Challenge has been a doozy. Things moved slower than I hoped, and I ran into several issues as I was working. But at the same time, some things worked out better than I hoped.
I don’t think the room will be completed at the end of 8 weeks, and I’ve made my peace with that. I’d much rather take more time than try to rush everything and end up fixing things later.
A few pivots
Late this week, I decided I wanted beadboard behind my shelves. My thought was that this would help the built-ins look even more professional, and that they’d be more classic in style. Plus, it’s a nice visual.
I then decided that beadboard should also go on the bench for continuity purposes. Even without the top trim or bench top in place, I’m happy with how it’s looking.
While I started making way on the beadboard for behind the built-ins, my nail gun jammed. It took about half an hour to take it apart and remove the jam. Then I was off and running…for about 2 minutes. And then it jammed. Again.
Took it apart, cleared the jam, then started working again. For another minute. Then it jammed again. I about lost my mind, uttered a few expletives, and jumped on Amazon to see if I could find an inexpensive replacement that could be delivered next day.
For those who travel by floo powder
Since I was unable to do work that required a nail gun, I started working on the fireplace. Let me tell you that if you’re considering building a corner fireplace…don’t. Hire someone or change your plans.
This fireplace is the bane of my existence right now, but if I get what’s in my head (and on my graph paper) into reality, it’ll be good. Are the angles and wood perfect? Nope. Is it level? Yes. How is it level? I couldn’t even tell you.
I’m still not 100% sure how I’m going to finish the fireplace, but I’ll figure it out.
“Diagonalley!”
I love the first time Harry uses floo powder and doesn’t distinctly say, “Diagon Alley!” I also love the first time we see Diagon Alley, and I wanted a nod to that in the room. Enter bricks.
I started getting the bricks on one wall using a peel and stick deal, and they can be painted! You can catch a glimpse of them on my latest Instagram reel.
More to come on that.
Getting ready for Week 7
I promise I’ll take more videos and pictures of progress this week. I was all over the place during week 6, trying to fit tasks in during my lunch hour to pulling out the saw after work to get cuts done before 8pm (in order to be a good neighbor), and I just didn’t feel like dragging my phone around everywhere to capture all of that.
I may have to pivot on the shelves, but I’m still thinking that over. Lots to do this week! If I can get everything built and prepped for paint, then Week 8 will be all paint! Fingers crossed.
Oh, and my Porter Cable nail gun arrived. So far, I love it! I’ll link it up next week if it still has my seal of approval.
I can’t believe we’re already in week 5 of the One Room Challenge! I truly feel so far behind right now, but I’m hoping I’ll get caught up with everything this weekend. Having to remove the popcorn ceiling myself threw a tiny wrench in things, but at least I saved a lot of money!
Let there be light (and more outlets)
This room doesn’t have the best lighting. While it gets great light from morning until mid-afternoon, the lighting setup is quite lacking. There are only 4 recessed lights in this space. And they’re all in a row. And they’re all on one side of the room. That’s it. No light fixture in the middle of the room. Just 4 lights over to one side.
To be fair, several of the outlets are wired to the light switch, so you could use multiple lamps if you wanted. I’m just not a big lamp person (or a little lamp person). The only reason we have lamps is so I can set them on timers for when we’re out of town and make it look like we’re home.
The only lamp I use is the one on my nightstand. And I have it on a smart switch, so I can turn it on and off using Google routines. I love a good Google routine. I’ll have to share more on that in another post.
This past week, I had electricians replace some recessed lights, install additional outlets, new light switches and get ready for a new chandelier to be installed. Unfortunately, the chandelier I’d purchased wasn’t UL certified, so they were unable to install it. That’s what I get for being cheap.
At least they were able to install a temporary light to tide me over until my new chandelier (the one I should’ve just ordered in the first place) arrives in a few days.
So now I have four new recessed lights, additional outlets higher on the wall where my built-ins will go, and overhead lighting in the center of the room.
Here are the links to the lights and smart switches I purchased. Just a heads up that they’re affiliate links. All that means is if you decide to buy using the link I provide, I get a few pennies at no cost to you.
Recessed lights (Heads up: Amazon is offering a lightning deal on these right now)
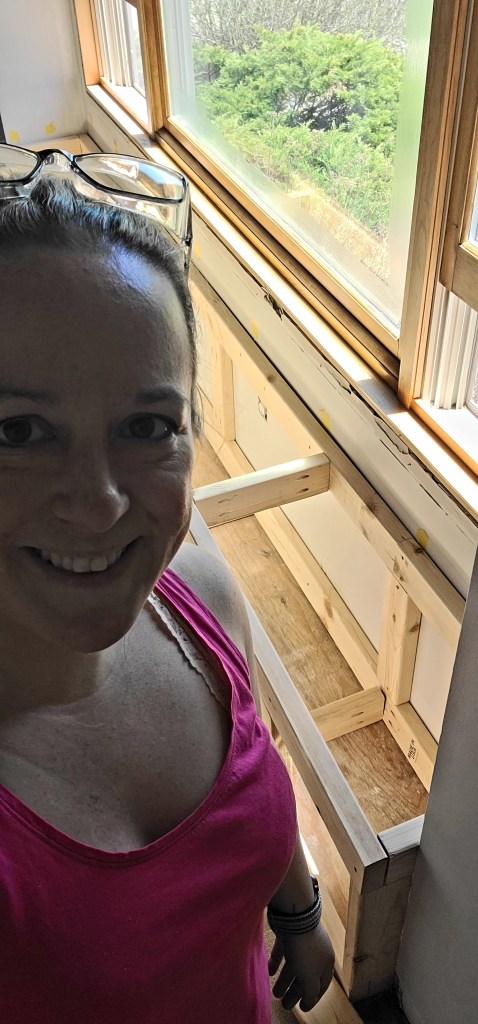
This week, I decided to tackle the built-in bench for under the window. That proved to be more difficult than I thought. Not only do I have a floor vent to take into consideration, but the corners are not square. I mean, what house has perfectly square corners? Certainly not this one!
To get started, I brought in some 2x4s to lay them out and figure out the cuts I’d need to build the bottom of the bench. I’m not going into detail because this entire bench project has been a cluster. I did have to cut out more carpet, which is terrifying as much as it’s fun.
Don’t worry. I saved the carpet just in case I really messed things up.
All I can say is that I must have purchased my measuring tape from Zonko’s Joke Shop because I’d measure about 3 times (every time) before I’d make a cut, used the same measuring tape by the saw, and my cuts were rarely perfect. Mind you, I didn’t expect perfection, but I did expect to be within a sixteenth of an inch.
I finally got to use my new Kreg jig to make a million pocket holes, and it was amazing. I can hook it up to the shop vac while I drill holes, and I’m left with next to no mess. If you want one for yourself, here‘s the link.
It took me a few nights and a little bit of Saturday morning to finally get the shell of the bench finished. Is it level? Yes. Does it look professional? Not even close. That’s where the finishing work comes in. But I did walk across the bench to make sure it wouldn’t fall apart. In hindsight, I probably should’ve asked for a spotter, but I was fairly confident that I had made the bench pretty well. And I’m pretty sure Blake was still asleep when I had finished up.
Oh yeah, don’t look too closely. Apparently, a couple of my 2x4s were not perfectly straight.
Hey, at least it’s level.
The beginning of the wall of built-ins
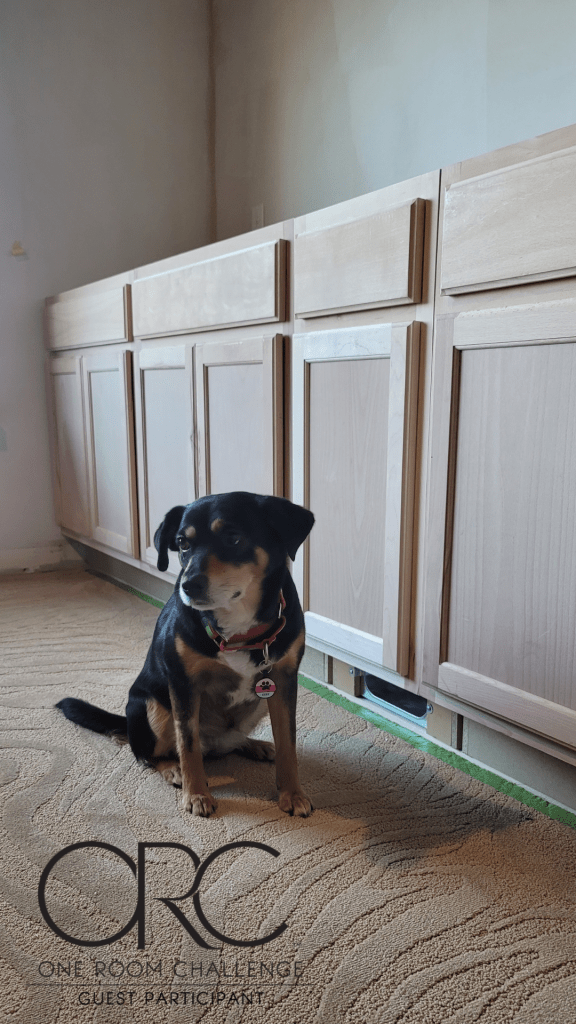
While I was on a roll with finally getting the bench started, I decided to tackle the built-in cabinets. This part was actually a tiny bit easier because I only needed a small base for the cabinets. The only problem here is that my new baseboards are 5.5″ tall, and the cabinets sit about 4.5″ above the carpet.
That meant that instead of using 2x4s, I was going to have to find something that was an inch. I did get some 5/4 select pine a couple years ago for a different project that I never completed, so I got to pull out the table saw and rip the 5/4 (because the actual size is 1 inch) down to 1″ boards.
No one lost any appendages. No wood came flying back at my face. I consider that a successful table saw adventure.
With the base, I just screwed the 1″ boards directly into the subfloor. Once that was done, it was time to start loading in the cabinets. But not so fast.
I had a couple obstacles to work around:
Outlets that I still need to access
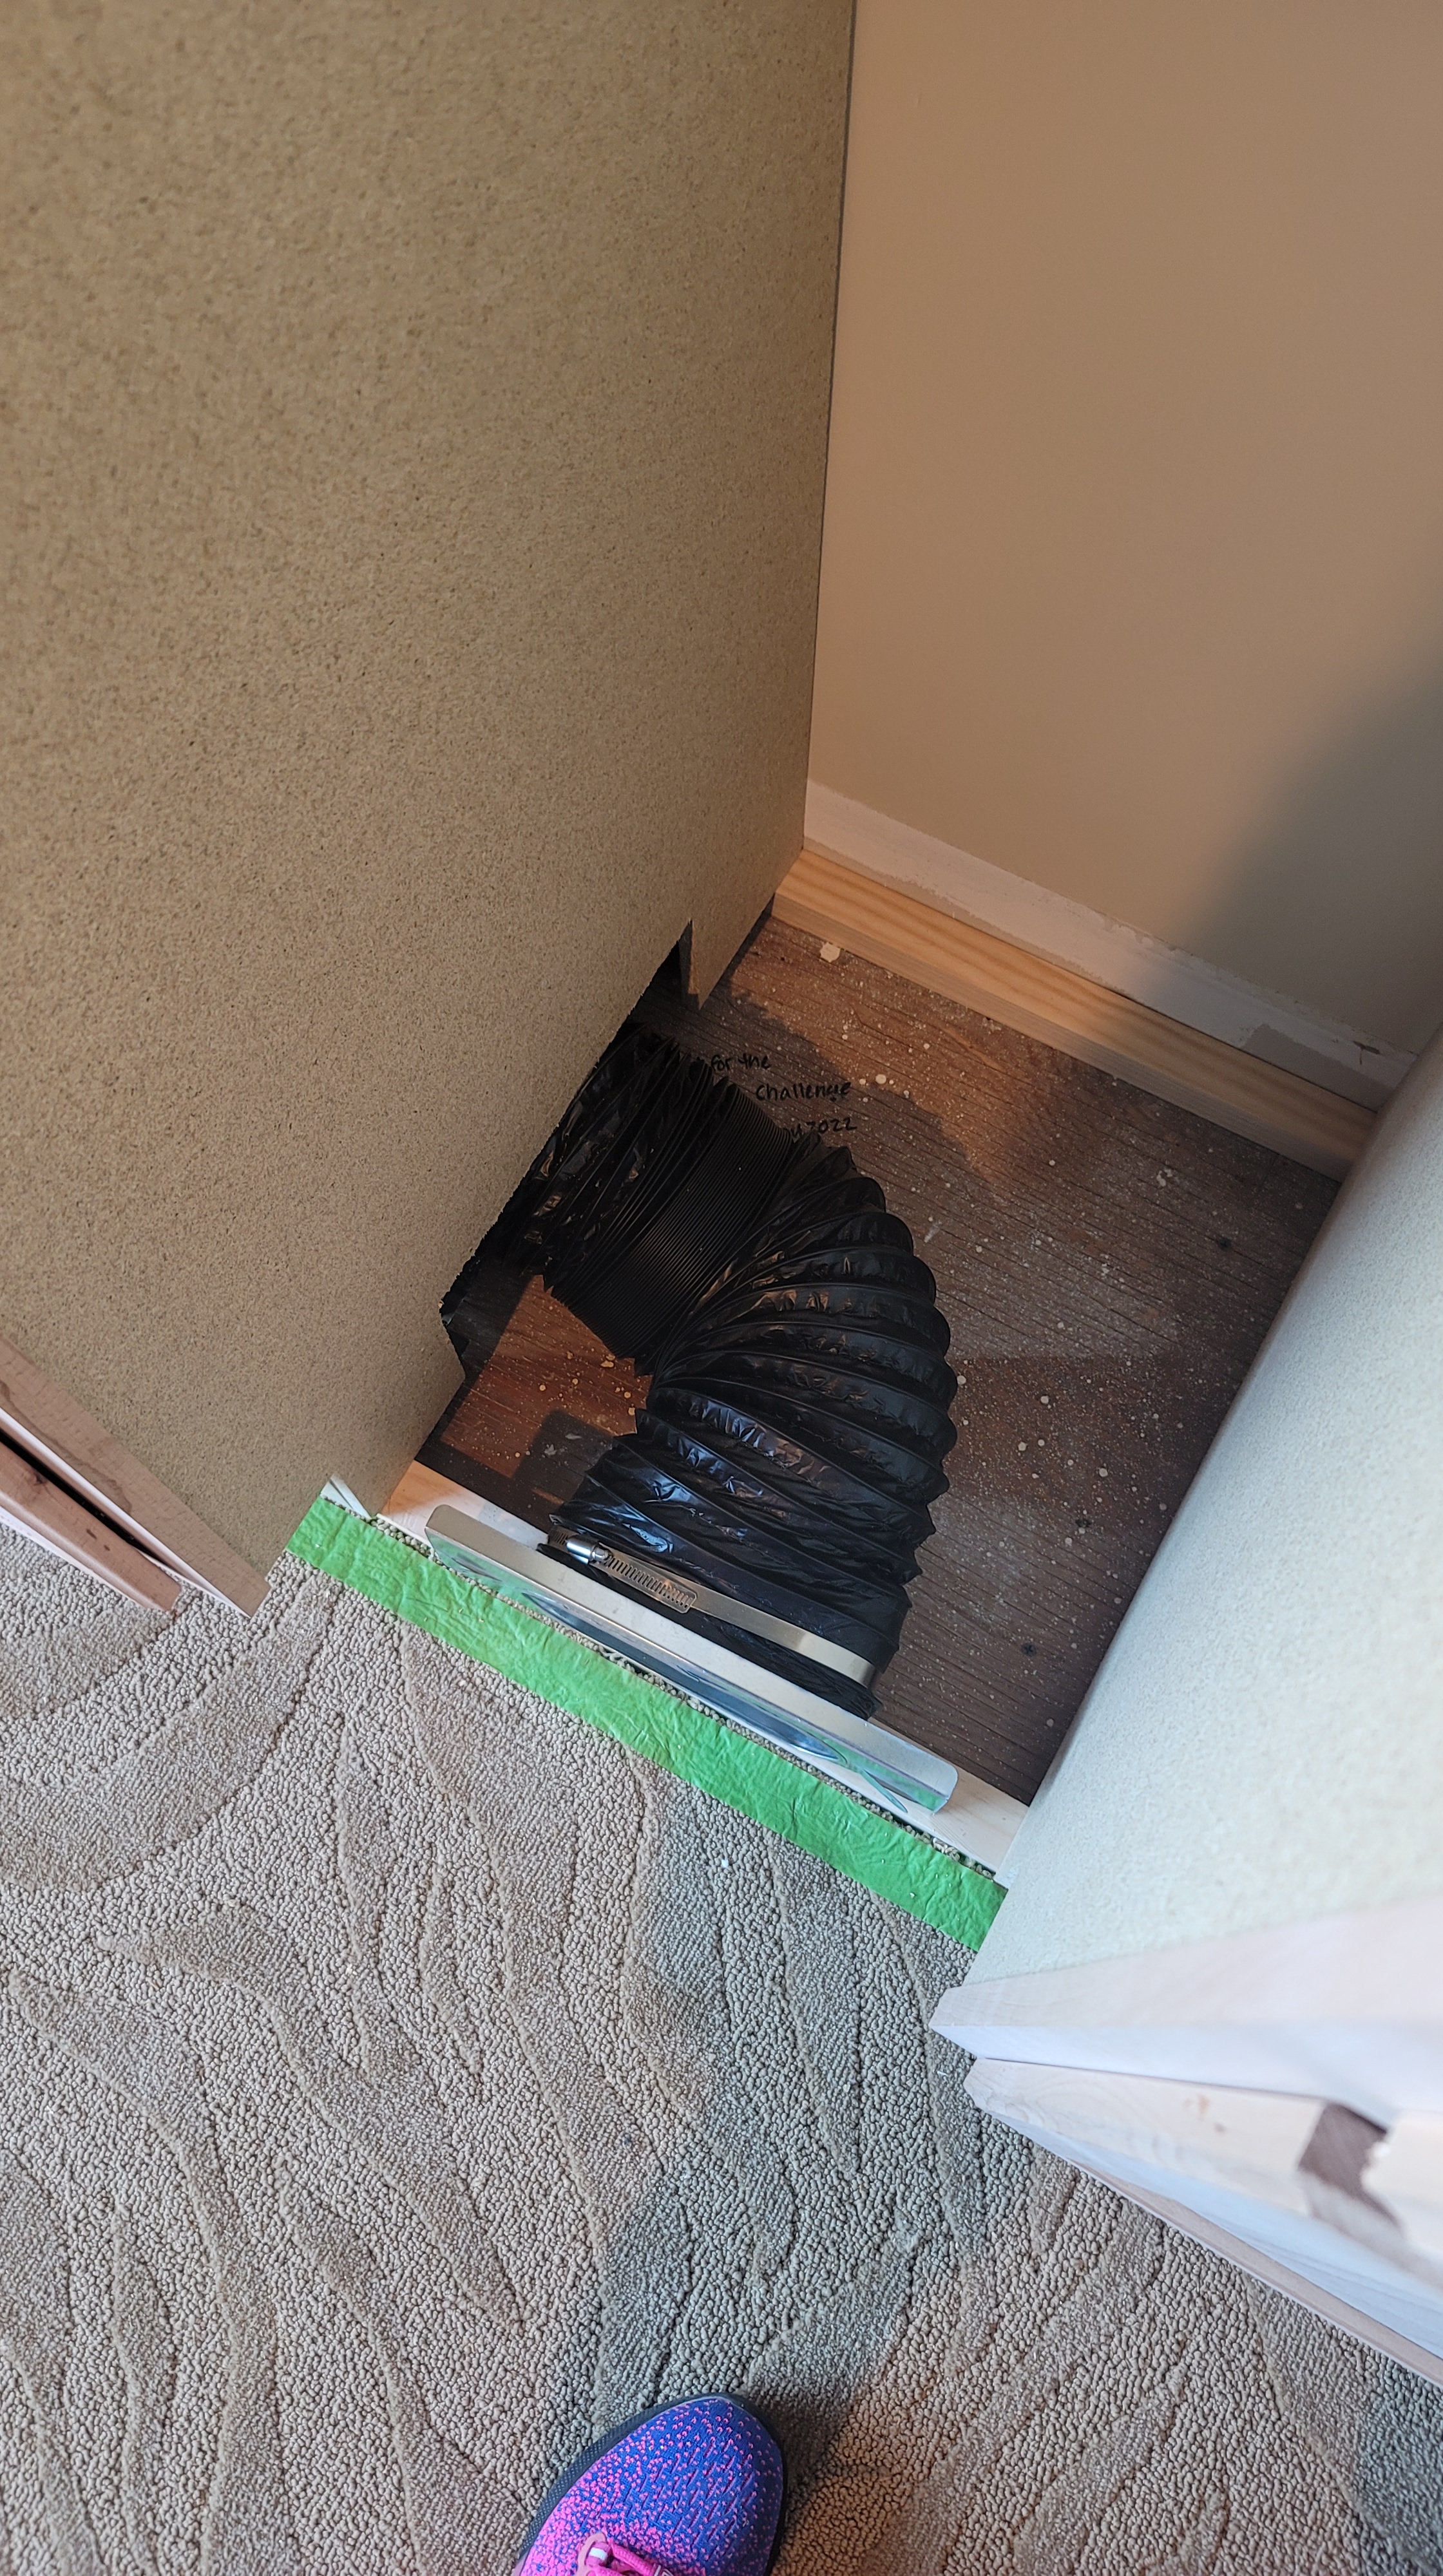
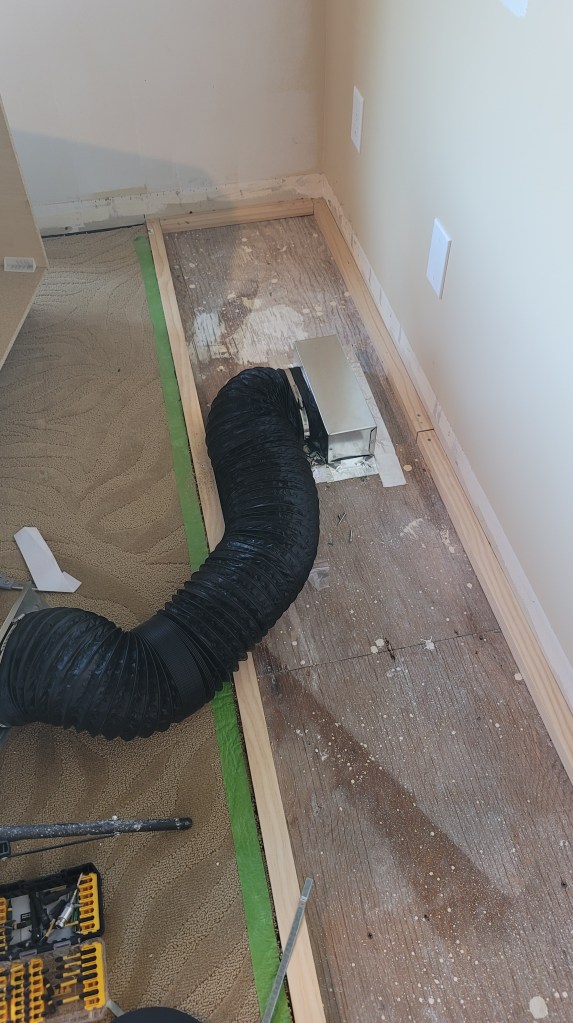
The pesky floor vent that isn’t centered on the wall
I purchased a Toe Ductor kit (I’ll include the link below) to make my floor vent into a toe-kick (or baseboard) vent. It came with one page of instructions that basically said, “Attach Part A to Part B using the venting tube; attach Part A to floor; attach Part B to toe kick.” It also said to check out their YouTube video for installation instructions, which, honestly, really wasn’t that helpful.
Since the floor vent isn’t centered on the wall, my conundrum is this:
The floor vent kit was going to extend across three cabinets.
Two cabinets have either an outline or a telephone outlet I have to cut holes for.
The vent needed to be centered on the wall, so I would have to cut out part of the base of the center cabinet.
Before I started installing the cabinets, I had to get the floor vent kit set up. I used some water-based duct sealant on the floor surrounding the air vent, as well as on the piece that attaches to the floor. Since I needed to move the air to the middle of the wall, I purchased longer vent tubing (about 8 feet, just to be on the safe side), screwed the piece into the subfloor and surrounded it with a special tape for ducting.
Once the floor vent kit was installed (at least the first part), I was able to cut out a portion of the cabinet that would be sitting over the vent piece. At this point, I had to enlist Blake’s help to move the cabinet over the venting piece. I also had to cut out a piece in the back of the cabinet so I could still have access to the outlet.
On the second piece, I had to cut large rectangles on the left and right sides to allow the vent tubing to fit underneath. I almost didn’t, but I decided to cut a piece for the telephone jack. We don’t have a landline, but hey, you never know.
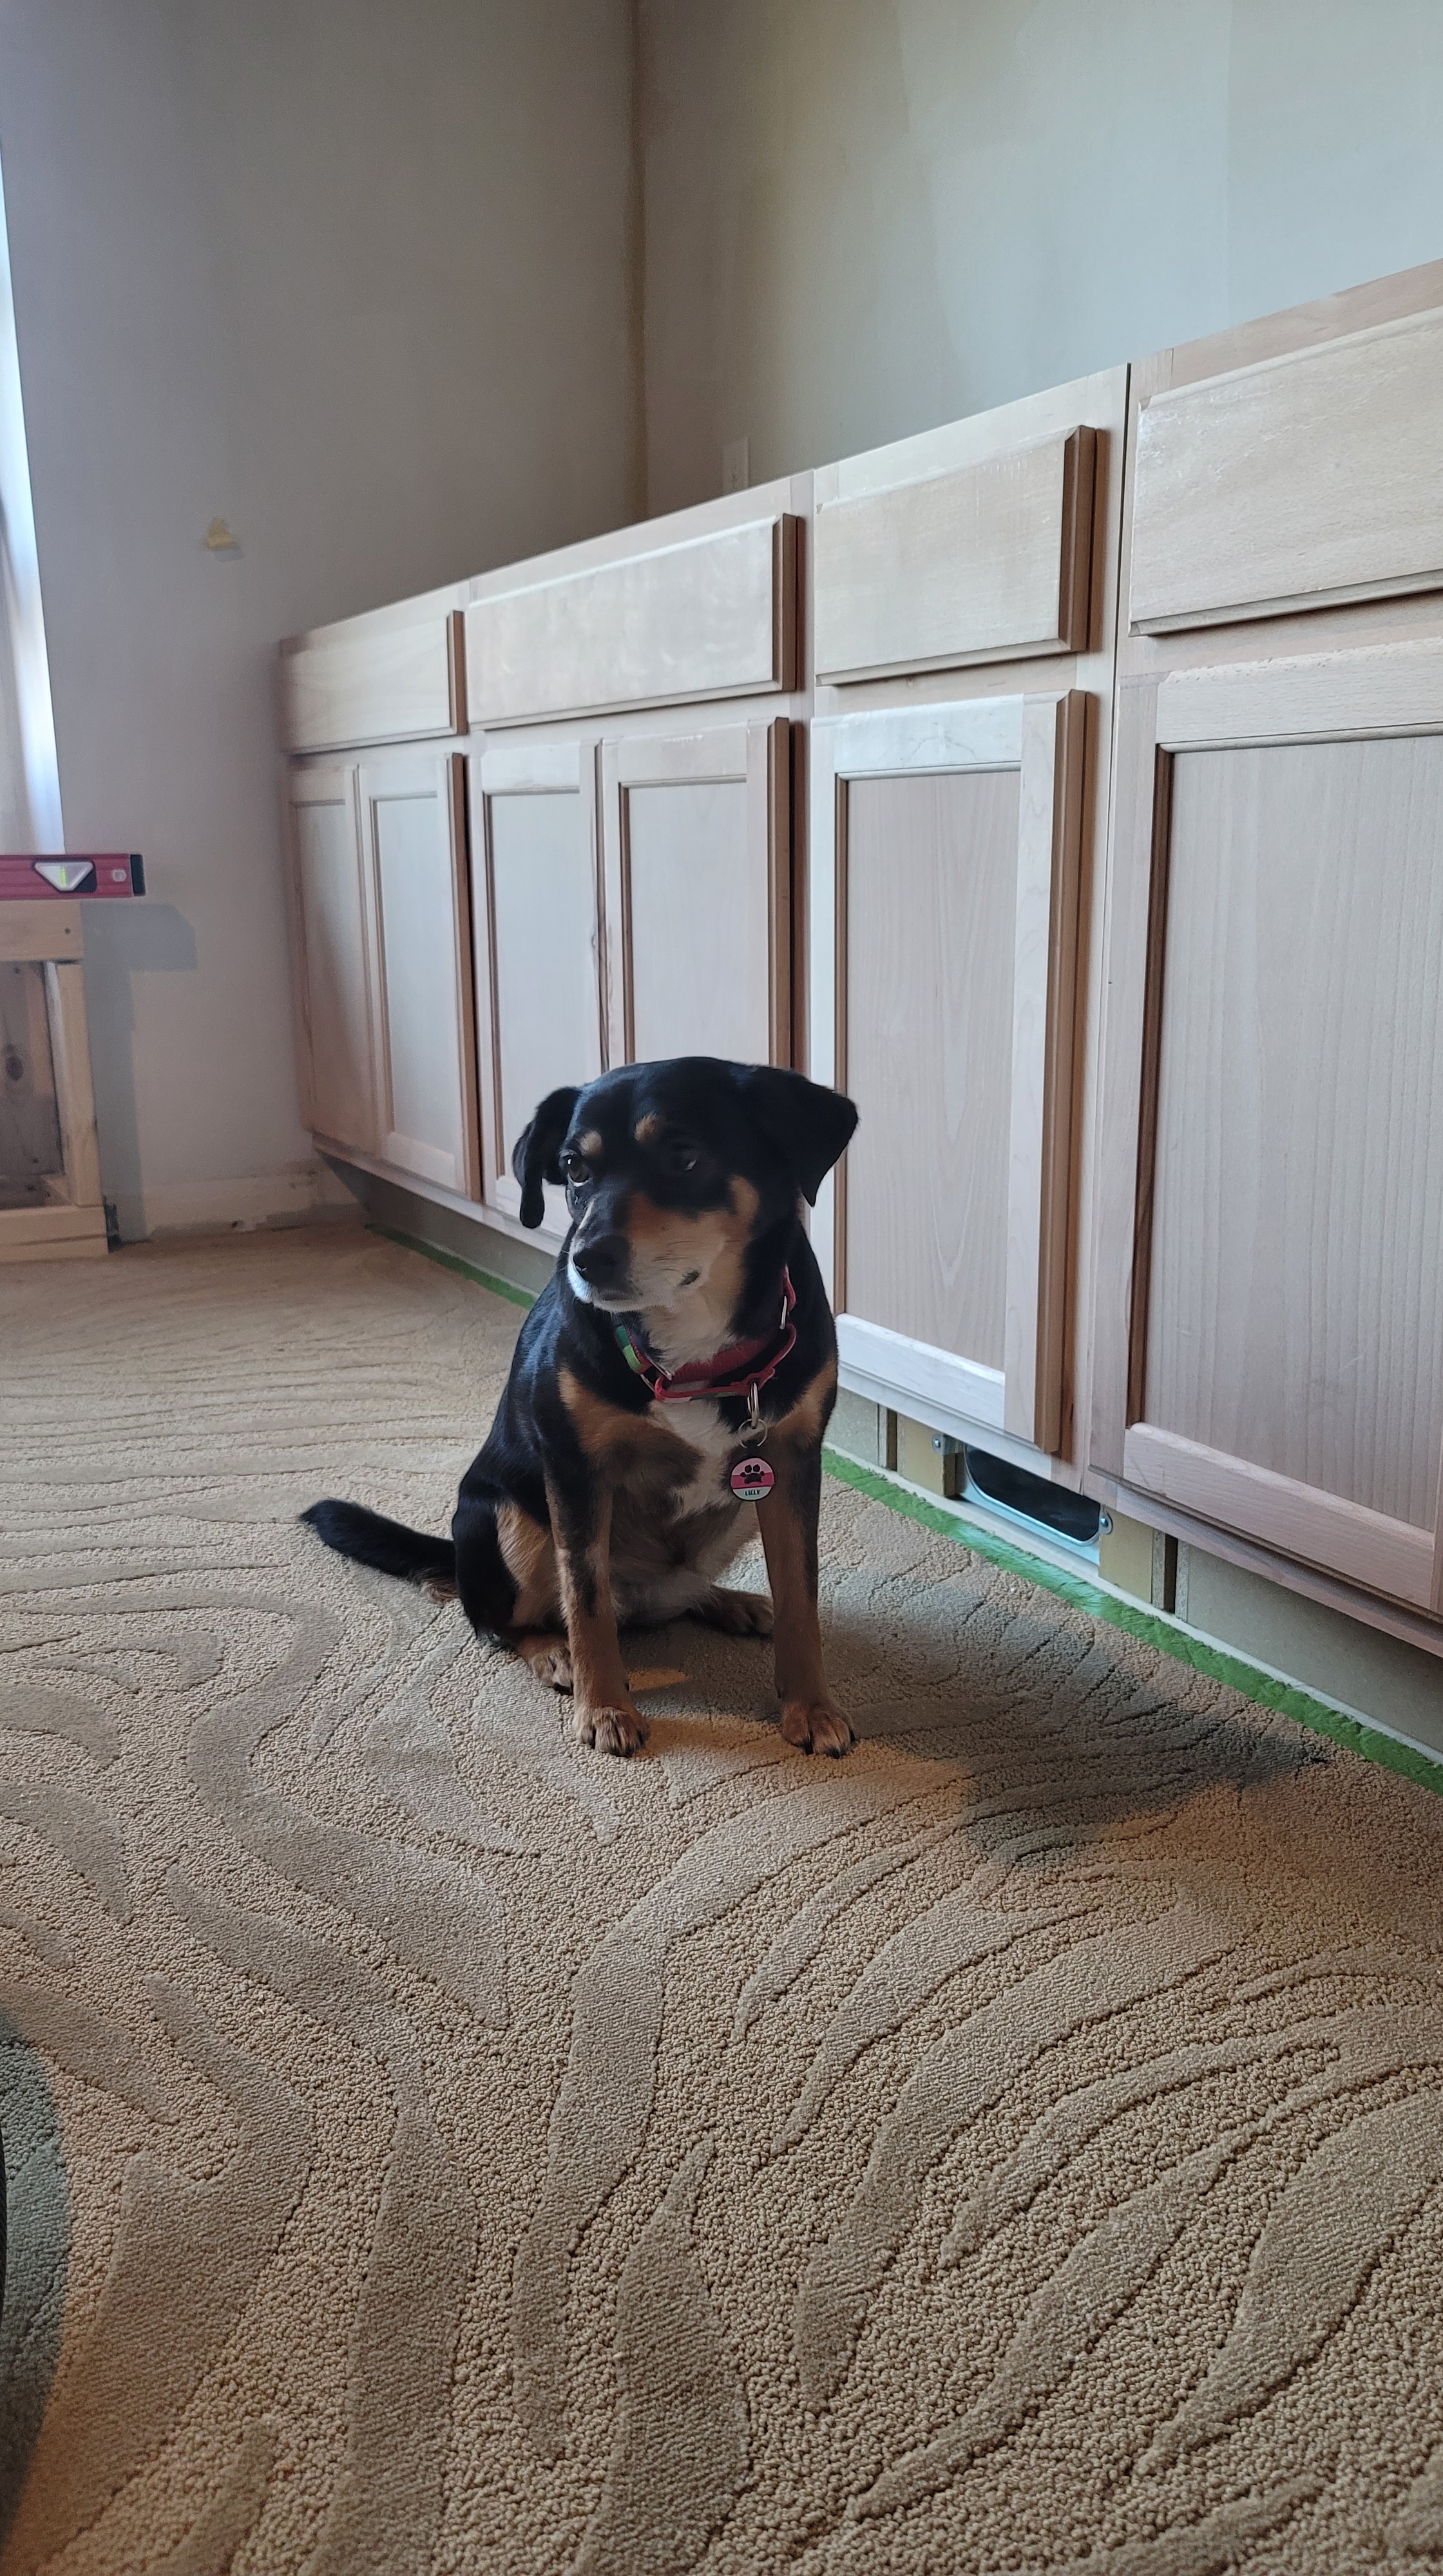
I saved the middle cabinet for last and focused on getting the other 2 cabinets in place.
Once all the other cabinets were in, I was able to start working on the middle cabinet. The middle cabinet was going to need a large hole cut in the bottom on the left side to allow for the vent ducting, and I was going to have to attach the other end of the vent to the toe-kick section of the cabinet. That meant cutting a large hole in the front of the toe-kick as well.
While the cuts aren’t perfect (still working on my jigsaw skills!), the vent fit perfectly, and I was able to get the cabinet in place with 1/16″ to spare on each side.
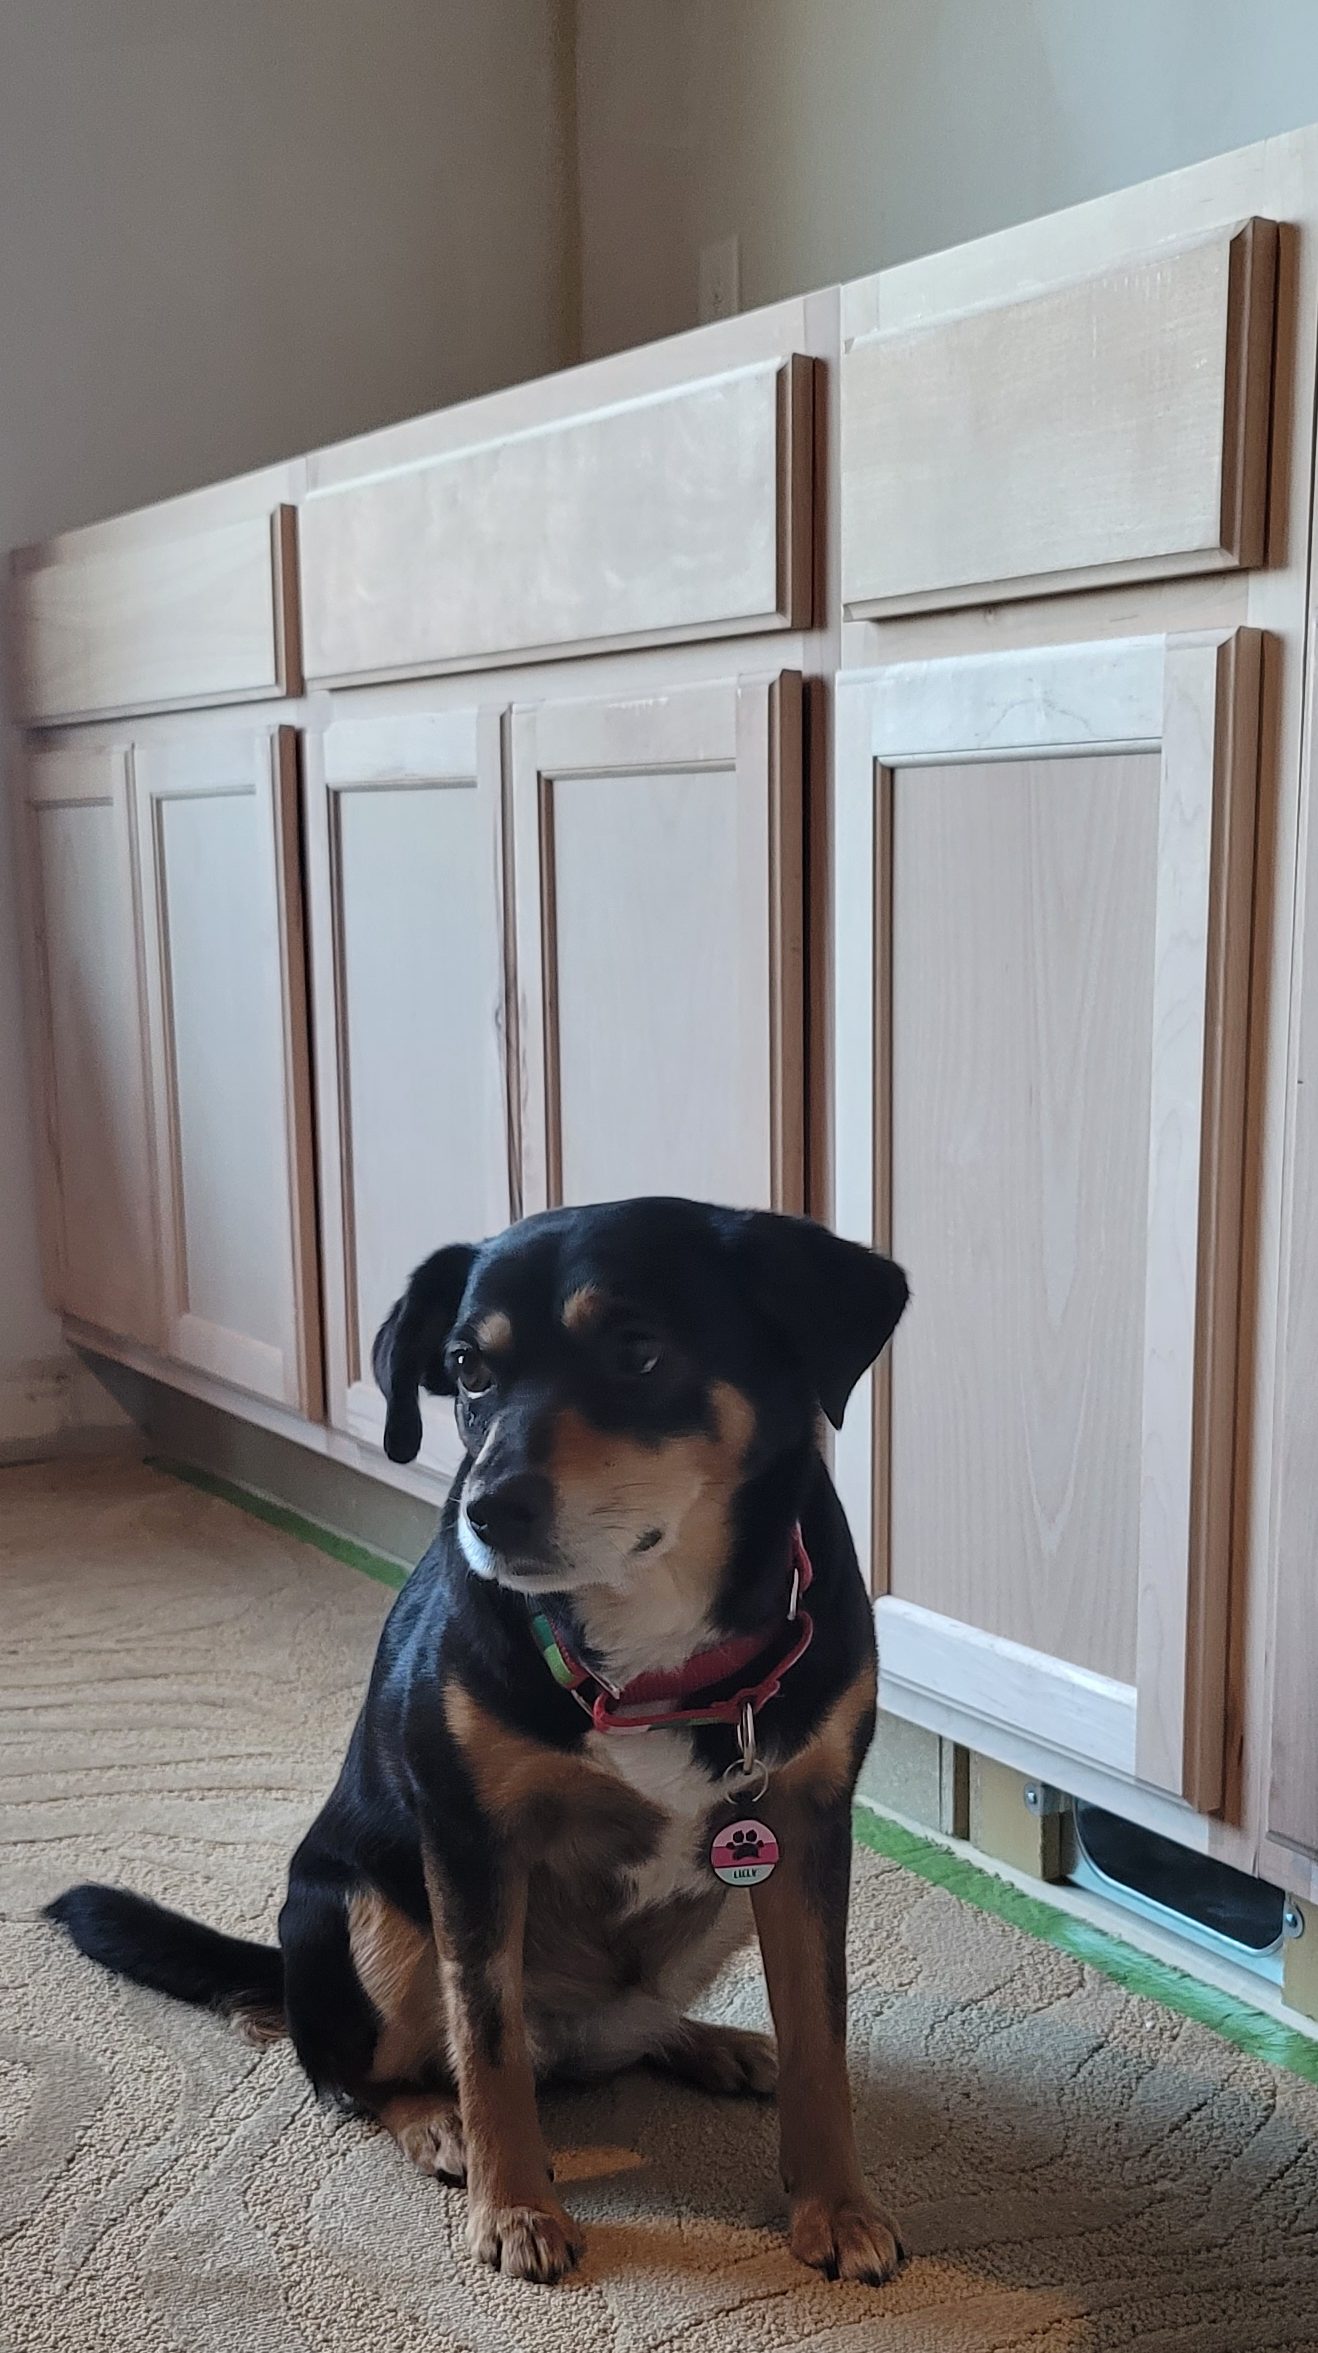
I was pretty proud of myself for getting the venting figured out and the cabinets in place. I tested a piece of baseboard, and it’s a perfect fit.
Lilly was pretty impressed, too.
Once everything was in place, and I was able to confirm the cabinets were level and even, I then secured them to each other using 0.5″ scrap pieces between the cabinets, as well as securing them to the studs in the wall. Those cabinets aren’t going anywhere!
Looking ahead to next week
Even though there’s a lot left on my to-do list, getting the skeleton of the bench and the cabinets completed was a huge step (and a huge relief!) forward. Looks like I’ll have to enlist Blake’s help when it comes to cutting the plywood and building the shelves because that plywood isn’t light!
I’m also hoping to get the finishing work done on the bench, along with getting the ceiling completed. It’s a lot to do, but I think I can get it done. Make sure you keep up with my Instagram stories. See you next week!
Here are the links to everything I used to move the floor vent:
I didn’t get anything done over last weekend because Blake and I flew to Atlanta to surprise my parents who are both celebrating a milestone birthday this year, and to see our sweet niece and nephews (and their awesome parents, of course). Amazing weekend spent with family!
Week 4 of the One Room Challenge didn’t feel productive, but looking back, I’m happy with the amount of progress I’ve made. Having to remove the popcorn ceiling myself threw a little wrench into the timeline, but I think I’ll be able to make up for it. Progress is progress…right?
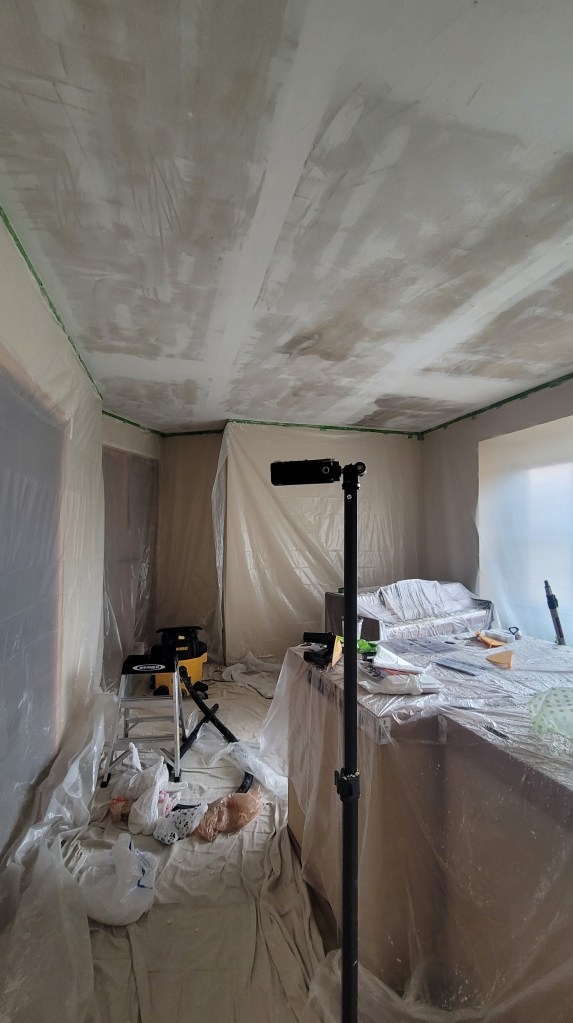
Ceiling progress
Last week, I removed the popcorn ceiling. This week, I had to fill in some spots with joint compound, sand down some spots I missed, and got the ceiling primed!
Even with just the primer on the ceiling, I’m extremely happy with how the ceiling is turning out.
I ran into a bit of a snafu when it came to the blue paint. I’d decided to use the same dark blue I’d used in the dining room for 3 reasons:
I already have it (so it’s free)
It’s perfect for the ceiling I’m envisioning
It helps with continuity on our main level
As I started mixing it, I noticed it was lumpy. I continued to stir, but the lumps didn’t disappear. I decided to attempt using it anyway.
After a few swipes with the roller, it was apparent that it wasn’t a great idea, so I had to scrape off the chunky lumps and order a new gallon of paint (there went “free”) . I think I just didn’t seal it well enough, so…lesson learned!
I picked up new paint from Sherwin Williams on Friday during my lunch break, and then got one coat on the ceiling before we left for a quick turn at the cabin.
Priming, prepping and planning
In addition to the ceiling paint, I got tape on the walls to mark the line of where the blue ends on the wall. I also got the walls primed to start with a fresh slate.
Once the electrical is done (more below), I can start with the cabinets and moving the floor vent and making it a toe-kick vent. I got that measured out and have a plan for getting that in place.
Planned progress…
This week should be a bit more productive! I have an electrician coming tomorrow to install a new light (like legitimately cutting into the ceiling, splicing some wires, and connecting a new feature) and hopefully a couple of new outlets.
Once that’s done (and as long as the weather is nice), I can get started on the built-ins…finally!
Make sure you’re following along in my stories on Instagram to see how this week goes.
If only there was a spell that could remove the popcorn ceilings in my new office…
Unfortunately, that’s not the case.
For week 3 of the Spring ORC, I decided to tackle the ceiling. There are a few reasons for this:
It’s messy.
It’s time-consuming.
It’s messy.
Before I get started on anything else, I really need to get the ceiling done. When you paint a room, you’re always supposed to start with the ceiling first, so that’s what we’re doing here.
Instead of letting my inner procrastinator take over this task, I decided to dive right in.
Preparation is important
Knowing that I’d be taking on the popcorn ceiling removal myself (without magic), I pulled open my favorite app (Amazon) and started looking for tools I’d need. There are two that I’m trying out:
In addition to the main ceiling scrapers, I also got a smaller set of scrapers (Amazon affiliate link) that were super helpful when it came to scraping close to the edges, along with a garden sprayer (Amazon affiliate link) to spray the ceiling with hot water.
I already had drop cloths to protect the floor and thick plastic to protect the walls, so no extra expenses there!
Since we’re spraying the ceiling with water, it’s important to protect the walls, no matter what. I taped plastic along the wall where it meets the ceiling and covered the entire room. I covered this process on Instagram, but here’s a quick view of how that looked.
A few tips:
Put tape on the back of the plastic first to help hold it in place.
Tape as close to the ceiling as you possibly can.
If you can, have someone help you.
It took me about 2 hours to get the plastic sheeting up on every wall, but it was well worth the time spent. I didn’t have to worry about the walls at all, and they stayed dry during the process.
Next up: Aguamenti
Once the walls were protected, I spread a drop cloth down in one corner. My thought was I could finish laying drop cloths while the water was soaking into the ceiling. (Work smarter—not harder.)
So, I pulled out my wand and cast the Aguamenti spell to start wetting the ceiling. Not really. But the sprayer looks sort of like a wand.
[Aguamenti is the spell for water.]
After all the research I did, I read that using hot water was key. So that’s what I did.
I started out small and just did a 2 ft. by 2 ft. square to see how the ceiling would accept the water. I let it soak for 10 minutes, then sprayed one more time and let it sit for 5 minutes.
I would actually recommend spraying a whole strip of the ceiling (about 3-4 feet wide) at a time. It will help you get through scraping much more quickly. As a frame of reference, the first day I worked on the ceiling, I spent about 2 hours scraping half the ceiling. On the second day (spraying larger sections), it only took me an hour to finish the other half of the room.
A few tips:
What goes up must come down, so make sure you’re wearing eye protection. And maybe a poncho.
Spray in larger sections and let the water soak in for at least 10 minutes.
Wear shoes. Nothing worse than stepping on a wet drop cloth in your socks.
Next step: Scourgify
Now came my nemesis: the popcorn. I was convinced part was going to take hours upon hours.
Using the Scourgify spell didn’t work, unfortunately.
[Scourgify is a charm used to clean.]
You’ll see how I struggled in the beginning. I even slowed the video so you could fully encompass the struggle.
While I had a rough start, once I got into a rhythm, scraping the ceiling was pretty quick and easy. Keep in mind that I tried two different tools. A manual scraper with a grocery bag attached (link above) and a scraper that attaches to my shop vac.
I posted a poll on Instagram asking which tool people thought would be more successful. An overwhelming 90% of you guessed the manual scraper.
And you were RIGHT!
The one that attaches to the shop vac doesn’t get my vote at all. I thought it would be great because it would suck up all the popcorn, but the “blade” was plastic and just wasn’t getting close enough to the drywall to be effective.
Lots of tips:
Use a grocery bag with the manual scraper and change it out once it gets heavy.
Unless you’re an expert with an extension rod (I was not), skip it and just climb up and down a ladder.
Take your time to avoid gouges.
Wear eye protection, a mask and, for those with long hair, a shower cap.
Expect to feel popcorn fall down your shirt and for everything to be covered in popcorn and whatever popcorn is made out of (joint compound), including your ladder.
Use the smaller scrapers to carefully go over sections that don’t seem to budge with the large scraper, as well as for next to the wall. It’ll be messy, but they’re a lifesaver.
The almost-final result
All in all, it took me about 3 hours total to remove the popcorn ceiling. There are a few places I’ll need to touch up and/or sand down, but that should be relatively easy.
If you’re not sure that you can do this yourself, you absolutely can. All it takes are the right tools, the right preparation, hot water and some patience. Seriously. I’d never done this before, which is why I was going to outsource it, but once we got the quote for it, I couldn’t justify spending a large amount of money on something like this.
Now that the popcorn is removed, I can touch up a few spots, clean the ceiling and prime, and then get started on the fun stuff.
Don’t forget to follow along in my Instagram stories for more real-time shenanigans.
If you have questions about any of the process, feel free to leave them in the comments. I’ll also post a question box on Instagram.