Spring 2022 ORC: Accio smooth ceiling
If only there was a spell that could remove the popcorn ceilings in my new office…
Unfortunately, that’s not the case.

For week 3 of the Spring ORC, I decided to tackle the ceiling. There are a few reasons for this:
- It’s messy.
- It’s time-consuming.
- It’s messy.
Before I get started on anything else, I really need to get the ceiling done. When you paint a room, you’re always supposed to start with the ceiling first, so that’s what we’re doing here.
Instead of letting my inner procrastinator take over this task, I decided to dive right in.
Preparation is important
Knowing that I’d be taking on the popcorn ceiling removal myself (without magic), I pulled open my favorite app (Amazon) and started looking for tools I’d need. There are two that I’m trying out:
- Popcorn ceiling scraper (Amazon affiliate link)
- Popcorn ceiling scraper for dry/wet vac (Amazon affiliate link)
In addition to the main ceiling scrapers, I also got a smaller set of scrapers (Amazon affiliate link) that were super helpful when it came to scraping close to the edges, along with a garden sprayer (Amazon affiliate link) to spray the ceiling with hot water.
I already had drop cloths to protect the floor and thick plastic to protect the walls, so no extra expenses there!
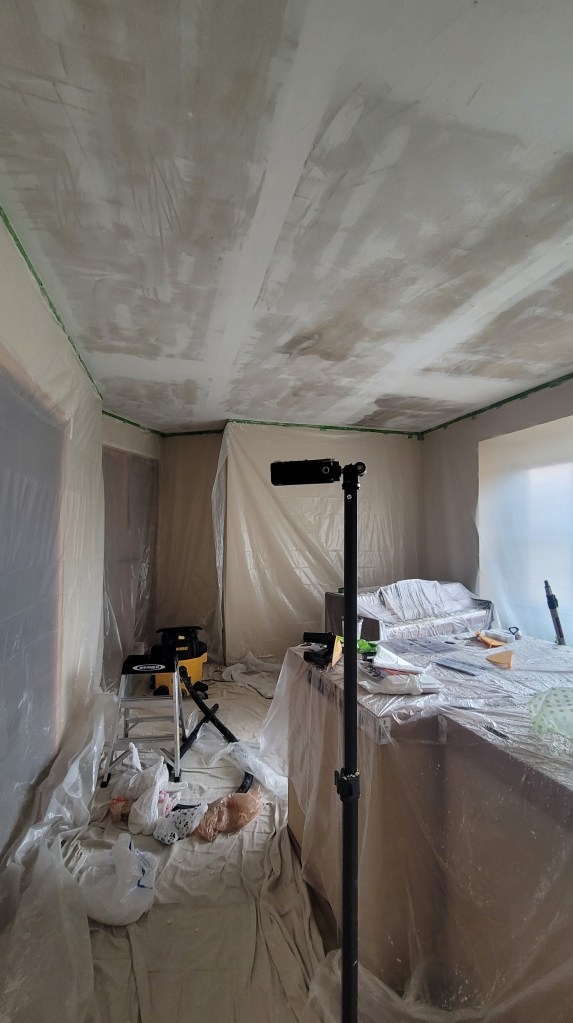
Since we’re spraying the ceiling with water, it’s important to protect the walls, no matter what. I taped plastic along the wall where it meets the ceiling and covered the entire room. I covered this process on Instagram, but here’s a quick view of how that looked.
A few tips:
- Put tape on the back of the plastic first to help hold it in place.
- Tape as close to the ceiling as you possibly can.
- If you can, have someone help you.
It took me about 2 hours to get the plastic sheeting up on every wall, but it was well worth the time spent. I didn’t have to worry about the walls at all, and they stayed dry during the process.
Next up: Aguamenti
Once the walls were protected, I spread a drop cloth down in one corner. My thought was I could finish laying drop cloths while the water was soaking into the ceiling. (Work smarter—not harder.)
So, I pulled out my wand and cast the Aguamenti spell to start wetting the ceiling. Not really. But the sprayer looks sort of like a wand.
[Aguamenti is the spell for water.]
After all the research I did, I read that using hot water was key. So that’s what I did.
I started out small and just did a 2 ft. by 2 ft. square to see how the ceiling would accept the water. I let it soak for 10 minutes, then sprayed one more time and let it sit for 5 minutes.
I would actually recommend spraying a whole strip of the ceiling (about 3-4 feet wide) at a time. It will help you get through scraping much more quickly. As a frame of reference, the first day I worked on the ceiling, I spent about 2 hours scraping half the ceiling. On the second day (spraying larger sections), it only took me an hour to finish the other half of the room.
A few tips:
- What goes up must come down, so make sure you’re wearing eye protection. And maybe a poncho.
- Spray in larger sections and let the water soak in for at least 10 minutes.
- Wear shoes. Nothing worse than stepping on a wet drop cloth in your socks.
Next step: Scourgify
Now came my nemesis: the popcorn. I was convinced part was going to take hours upon hours.
Using the Scourgify spell didn’t work, unfortunately.
[Scourgify is a charm used to clean.]
You’ll see how I struggled in the beginning. I even slowed the video so you could fully encompass the struggle.
While I had a rough start, once I got into a rhythm, scraping the ceiling was pretty quick and easy. Keep in mind that I tried two different tools. A manual scraper with a grocery bag attached (link above) and a scraper that attaches to my shop vac.
I posted a poll on Instagram asking which tool people thought would be more successful. An overwhelming 90% of you guessed the manual scraper.
And you were RIGHT!
The one that attaches to the shop vac doesn’t get my vote at all. I thought it would be great because it would suck up all the popcorn, but the “blade” was plastic and just wasn’t getting close enough to the drywall to be effective.
Lots of tips:
- Use a grocery bag with the manual scraper and change it out once it gets heavy.
- Unless you’re an expert with an extension rod (I was not), skip it and just climb up and down a ladder.
- Take your time to avoid gouges.
- Wear eye protection, a mask and, for those with long hair, a shower cap.
- Expect to feel popcorn fall down your shirt and for everything to be covered in popcorn and whatever popcorn is made out of (joint compound), including your ladder.
- Use the smaller scrapers to carefully go over sections that don’t seem to budge with the large scraper, as well as for next to the wall. It’ll be messy, but they’re a lifesaver.
The almost-final result
All in all, it took me about 3 hours total to remove the popcorn ceiling. There are a few places I’ll need to touch up and/or sand down, but that should be relatively easy.
If you’re not sure that you can do this yourself, you absolutely can. All it takes are the right tools, the right preparation, hot water and some patience. Seriously. I’d never done this before, which is why I was going to outsource it, but once we got the quote for it, I couldn’t justify spending a large amount of money on something like this.
Now that the popcorn is removed, I can touch up a few spots, clean the ceiling and prime, and then get started on the fun stuff.
Don’t forget to follow along in my Instagram stories for more real-time shenanigans.
If you have questions about any of the process, feel free to leave them in the comments. I’ll also post a question box on Instagram.
